Before we review the Sizzix Vagabond electric cutting machine, I want to mention a quick sentence about Tim Holtz. So, who is Tim Holtz? Tim Holtz is a well-known designer and the Creative Director or Ranger Industries. He has teamed up with Sizzix to bring you the unique and fun Vagabond machine.
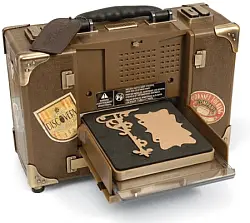
The Sizzix Vagabond machine is unique in a couple ways. First, the machine looks like a well-traveled suitcase. The sides open up with the push of a button, and the power cord can be unhooked and stored away in the side compartment, which is great for traveling. The second way the machine is unique is that it contains a strong electric motor, so no hand cranking! This is great for those with carpal tunnel, arthritis, or shoulder problems. Plus, it’s fun!
Because of the motor, the machine does have a little more weight compared to the typical manual die cutting machine. It weighs 14lbs, which isn’t terribly heavy. It also has a carrying handle to make transporting it more convenient.
Sizzix Vagabond Design and Features
Cuts and embosses dies and folders from different manufacturers
6-inch cutting width
Cute suitcase design that folds up
Strong electric motor to feed to cut or emboss materials
Power and reverse buttons
This Vagabond Machine is only compatible with power requirements that are the same as those found in the United States and Canada.
Cutting and Embossing using the Sizzix Vagabond Machine
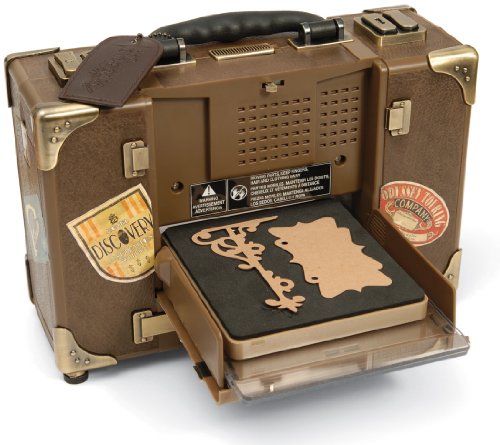
Using the Vagabond machine is very similar to using any other manual die cutting machine from Sizzix. The Vagabond comes with two cutting plates, the solo platform, and shim. The solo platform and shim are used when needed, depending on what cutting die you are using. Thicker cutting dies may not need the platform or shim, but thinner dies might. It’s easy to know when you need to use the platform or shim because there are directions right on them. What’s pretty neat is that the shim snaps onto the solo platform, so it doesn’t move around and for easy storage.
Sizzix Solo Platform and Shim
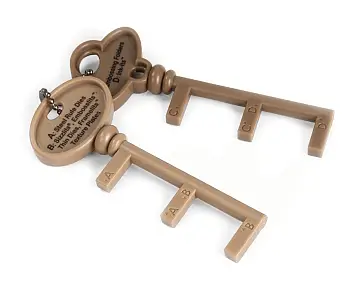
Important! – Some users have jammed their machine by not following directions properly. If the incorrect sandwich is made for the machine that is too thick, the material will go through the machine half way and get stuck. To prevent this, always be sure to follow the directions, or purchase a set of Sizzix Gauge Keys to measure the thickness of the sandwich before you cut.
Sizzix Gauge Keys
Cutting and Cutting Dies
Anything that scissors can cut, the Sizzix Vagabond can cut as well, including thicker materials like matboard and grungeboard, generally up to 1/8th” thick, which is pretty impressive. Fabrics, felt, and leather can also be cut.
The Sizzix Vagabond can work with a variety of dies from other manufacturers, including:
All Sizzix dies thinner than the Sizzix Bigz dies
Cuttlebug
Spellbinders
Quickutz
If you are cutting wafer thin dies, like the Sizzix Framelits or Thinlits, then you’ll need to purchase the Sizzix Solo Wafer-Thin Die Adapter.
Embossing and Embossing Folders
The Vagabond machine will accept A2 sized embossing folders and even the Cuttlebug Embossing Plus folders. The solo shim can be used to give more depth to the emboss, giving it a nice crisp look.
Overall, the Sizzix Vagabond is a strong and quiet machine. If you no longer have the strength in your wrist or shoulders to use a hand crank, the Vagabond can be a great option. The suitcase design is cute and folds up for easy portability. The only thing with the machine is that you have to be careful not to get the material and pads stuck in the machine.
One of the cheapest places I’ve found to purchase the Vagabond is through Amazon. Check out the price and read what other customers are saying.
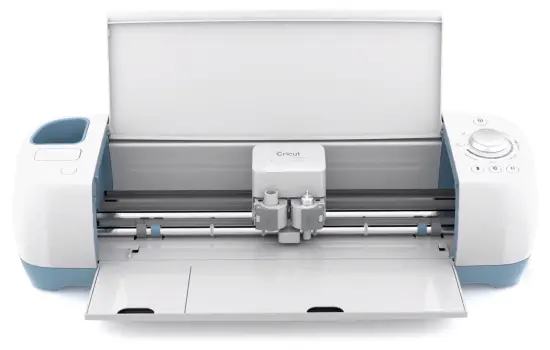
The Cricut Explore Air 2 has become one of the most popular die cut machines, and for good reason. Cricut’s philosophy of making cutting fun and easy to use can be seen in the Cricut Explore Air 2. Unlike other more complicated machines, users have been able to open the box and start cutting within minutes. Let’s see what’s inside with the Cricut Explore Air 2 review!
The Cricut Explore Air 2 is one of the most user-friendly machines on the market. It’s great for beginners but also has everything a more advanced user would need in a die cut machine. It has 350 grams of cutting force, which is more than the Silhouette Cameo.
You can expect to cut a lot with this machine including vinyl, cardstock, glitter paper, and leather to name a few – but don’t to be cutting heavier material like basswood. Save heavy cutting for the Cricut Maker machine.
Design and Features
Before we go into more detail about the Cricut Explore machine, here’s a quick list of features:
Cut, draw, and score
350 grams of cutting force
Cuts over 100 different materials with 12″ x 12″ or 12″ x 24″ cutting mat
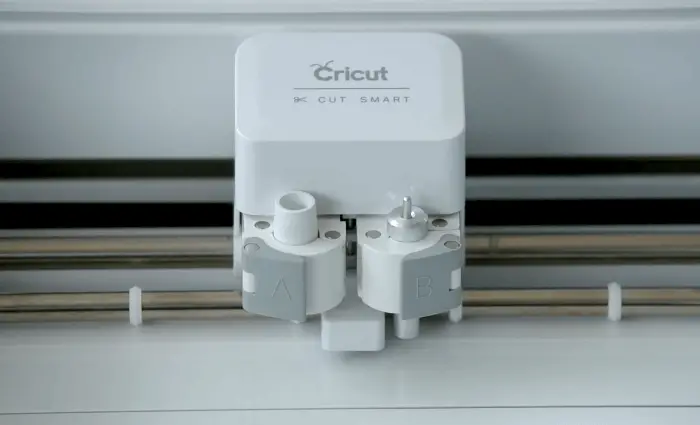
Dual tool holders to cut and draw in one step
Long lasting German carbide blade
Smart Set Dial to easily configure blade to material
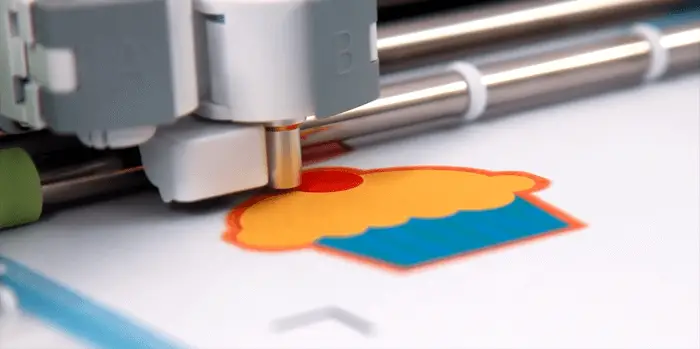
Print then Cut feature
Bluetooth capability to cut wirelessly
Online Design Space software
What Can the Cricut Explore Air 2 Cut?
The Cricut Explore Air 2 can cut over 100 materials using up to 350 grams of force. Here is a list of some of the most popular items it can cut:
Paper
Vinyl
Iron-on
Cardstock
Fabric such as wool, felt, silk, genuine leather, bonded denim, and burlap
Craft Foam
Wrapping Paper
Aluminum Foil
Wax Paper
Magnetic Sheet
Aluminum – 0.14mm
For thicker materials, the Cricut Explore comes with a multi-cut feature to cut designs multiple times.
And for certain materials, you’ll want to be sure you are using the right blade. For example, some thicker materials will require the Deep Point Blade.
Pretty standard nowadays with electronic cutting machines is having the ability to use two tools at once. Cricut was one of the first companies to come out with such a feature.
With the double tool holder, you can now cut and write or cut and score in a single step. You won’t have to pause the project to swap out tools like you previously would. It’s a nifty feature, but if you know you won’t be using two tools at once, you can check out the Cricut Explore One. The Cricut Explore One has one blade holder and is cheaper than the Cricut Explore Air 2.
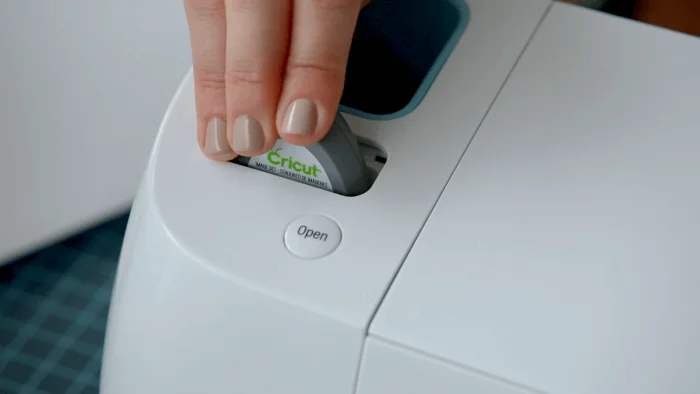
The Cricut Explore Air 2 comes with the housings pre-installed in the clamps. Remembering which tool goes in which holder is easy:
The Cricut Maker comes with additional tools such as the Knife Blade, Rotary Blade, and Scoring Wheels. These tools are exclusive to the Cricut Maker and are not compatible with the Cricut Explore machines.
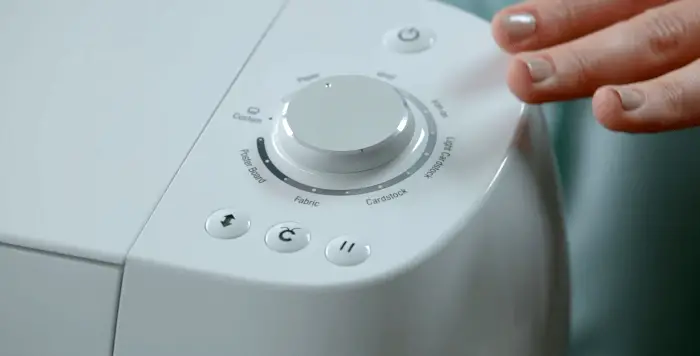
Smart Set Dial
The Smart Set Dial is a large dial on the side of the machine that makes cutting so much easier. All you have to do is turn the dial to the material you want to cut, and the Cricut Explore takes care of all the settings for you. No more guesswork!
The most common settings are shown on the machine, but if you wanted additional settings, select ‘Custom’ and select the material you want to cut in the software. You can ever enter in your own settings and save them to be reused later.
Print then Cut
The Print and Cut feature is another feature that comes standard with all electronic cutting machines. What this feature allows you to do is print your favorite designs off your home printer and cut them out using your Cricut machine.
Now, keep in mind the Cricut Explore is not a printer itself, so it won’t be able to print on paper as a regular printer would.
Does the Cricut Explore require cartridges? Nope! Cartridges are now becoming a thing of the past, and that’s a good thing.
However, if you do still have cartridges, you can still use them in the Cricut Explore Air 2. The only thing is, you’ll need to link your physical cartridges to the online Design Space software. Unlike some of the older Cricut machines, you won’t be able to use your Explore machine without internet unless you have the iOS app.
Built-In Storage Space
The Cricut Explore actually has a surprising amount of storage space. The most obvious is the storage cup on the side of the machine. This storage cup is perfect for storing tools that you use most often and easy storage when the machine is in use.
Other storage compartments are under the bottom flap keeps everything organized that you might not use as often, such as other tools and blades. There’s even a magnetic strip to store extra blades and prevent them from moving around.
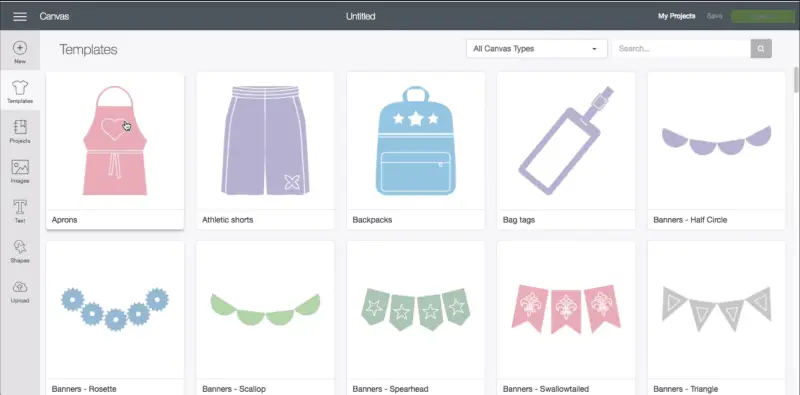
Cricut Design Space
The Cricut Design Software is a free online software for creating your own designs for the Cricut Explore. The software is web-based and does require an internet connection. If you have a slow or unreliable internet, this could be a problem.
The good news to using online software is that it’s always updated automatically and projects are stored in the cloud. If you use multiple computers or get a new computer, all your designs and purchases will be available.
Creating and Importing Designs
If you want to create your own designs from scratch, design space is more limited. The software allows you to select and manipulate existing designs, so if you’re looking to create designs from scratch, you’ll be better off creating them in a different program like Adobe/Illustrator and importing them.
Unlike the Silhouette software, importing SVG files is free. Other compatible file types for Design Space are are .svg, .png, .dxf, .gif, .bmp and .jpg.
Cricut Access Subscription
One thing people sometimes get confused about is whether or not you have to pay for Design Space. Design Space is free. However, if you want to purchase designs and fonts, you can. If you plan on purchasing a lot of designs, Cricut offers a monthly subscription plan called Cricut Access.
Cricut Access gives you:
Unlimited access to over 400 beautiful fonts
Unlimited use of over 50,000 premium Cricut images
And a lot of other perks like 10% off Cricut Purchases and Licensed images and fonts.
There are a few payment options that come with slightly different benefits. I won’t go into too much detail here, but Cricut Access can be a great way to save on designs.
The important thing to understand here is, with Cricut Access, you are paying to have access to these designs. Once you cancel your subscription, you will no longer have access to the designs unless you sign back up.
What happens with some people is they use the free trial and once it expires, they no longer have access. This leads some people to mistakingly believe they have to pay for the Design Space software.
The Cricut Explore Air vs Cricut Explore Air 2
The differences between the Cricut Explore Air and Cricut Explore Air 2 is that they are exactly the same, except that the Explore Air 2 can cut twice as fast. The Air 2 is more expensive, but if you are cutting a lot or run a craft business, it could be worth the time savings.
What’s included in the Cricut Explore Air 2
What I like about buying the Cricut Explore Air 2 is that it really does come with everything to get started, including material to create your first project.
• Cricut Explore Air 2 machine • Premium Fine-Point Blade + Housing • Fine Point Pen (Black) • LightGrip Mat 12″ x 12″ • Welcome Guide • USB cable • Power adapter • Free trial membership to Cricut Access (for new subscribers) • 50 free ready-to-make projects • Materials for a practice project
Overall, the Cricut Explore is one of our favorite die cutting machines. It’s more powerful and precise than the Silhouette Cameo. If you are a beginner or don’t want anything too complicated, the Cricut Explore Air will be a great choice. The Smart Set Dial makes it easy to create projects and the Cricut Design Space allows SVGs to be imported for free.
Where can I buy the Cricut Explore Air 2?
The Cricut Explore Air 2 can be bought online from the following:
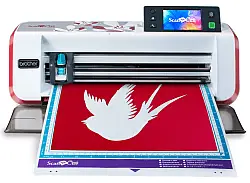
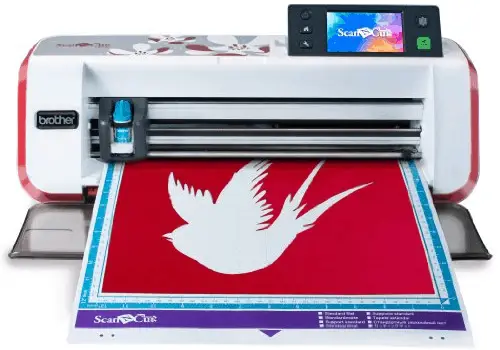
The Brother ScanNCut is a unique electronic die cutting machine that has a built-in 300 DPI scanner. With the Brother ScanNCut, one is able to scan virtually anything into the scanner to have the machine automatically create cut lines. You can scan stamped images, hand drawn designs, magazine cutouts, or photos. Once these designs are created, they can be saved to the Brother’s internal memory, or saved to an external USB drive. The Brother ScanNCut comes with a built-in touch screen to manipulate and move images, and works without a computer or cartridges. With such features as a scanner, we found this Brother ScanNCut review to be fun and unique.
Built-in 300 DPI Scanner can be used to scan and cut designs, create custom shapes, or save .JPG files.
USB Drive input allows for saving files or downloading new designs.
Internal memory stores custom designs and comes preloaded with basic shapes, borders, and fonts.
Full-color LCD touch screen to manipulate designs.
Built specifically with fabric in mind to create seam allowances and sewing guidelines
Cut and draw using the 12″ x 12″ or 12″ x 24″ cutting mat.
Using the Brother ScanNCut
The Brother ScanNCut is a stand-alone machine, meaning it doesn’t require a computer to operate. In fact, there is no way to connect it to a computer. There is still software you can use with it, however (more on that below). The machine is also cartridge free, in the sense it doesn’t use cartridges. I will mention that Brother does sell USB drives that contain images, but these USB drives are not required to operate the machine.
This machine is a fairly straightforward machine to use, and there isn’t too much of a learning curve compared to other machines. The Brother ScanNCut manual is easy to understand.
Cutting Mats
Anytime you scan, cut, or draw, you’ll want to use the cutting mat. The cutting mat comes in two sizes, 12″ x 12″ and 12″ x 24″, and two different types, a regular version, and the low tack adhesion version, which is used for more delicate materials.
One downside of the Brother ScanNCut are the mats. The mats aren’t sticky enough. One has the option of taping the edges of the material to the mat, to prevent the material from moving around.
Scanning
The Brother ScanNCut comes with a built-in 300 DPI scanner. Images can be scanned into the machine from a variety of places. This includes hand-drawn designs and fonts. Once the material is scanned, the Brother detects the scanned pattern and automatically creates cut lines. The machine can then proceed to start cutting the traced designs, or the designs can be saved to internal memory, where they can be cut on different materials.
What’s neat about the Brother ScanNCut is that scanned images can be saved to a USB drive as a .JPG file, where it can be kept as a backup or altered further using 3rd party software.
Scanning works best with darker lines. For example, if you had a design that was light pink, the machine may not detect the design. One trick is to outline the design lightly with a pencil. After scanning, the pencil can be erased.
Cutting
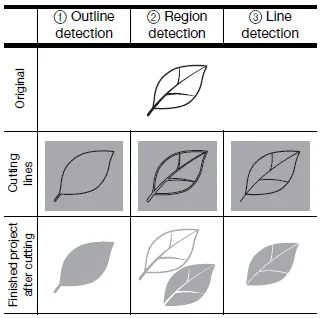
Once an image is selected, either from the USB drive, internal memory, or from a scanned image, it can be cut in 3 ways:
Outline detection: The outline of the design is cut. Cut lines inside the design are ignored.
Region detection: The outside of the design is cut, as well as any inside designs.
Line detection: Only the inside lines are cut.
Brother ScanNCut Cut Modes
The Brother ScanNcut also comes with 2 different blades, a regular blade and a deep cut blade for thicker materials. The blade holders are color coated to tell the difference between them.
Drawing
In addition to scanning and cutting, the Brother ScanNCut can also draw. You can even draw hand-drawn designs or phrases.
To draw, you’ll need to purchase both the pen holder and pens. The pen set is somewhat limited when it comes to color.
Cutting and using fabric
The Brother ScanNCut was designed with quilters in mind. Cutting fabric does require a few extra steps to prepare compared to paper materials.
Here’s how to cut fabric with the Brother ScanNCut:
If possible, starch and iron your fabric to make it flat
Next, apply the fabric sheet to the standard mat
Then, apply your fabric to the mat.
Use the spatula and press it against the fabric to make sure there are no air pockets
Start cutting!
It’s always good to do a test cut on a smaller piece of material to test the blade depth and blade speed.
Check out the video demonstration of cutting leather:
The Brother allows you to add seam allowances to the fabric in 1/4″ increments, which is perfect for quilters.
With the erasable pen set, one can draw seam allowances or other temporary lines on fabric. The ink in the blue pen can be washed out with water, while the ink in the purple pen is designed to disappear after a few days.
Brother ScanNCut Canvas Software
The Brother ScanNCut doesn’t connect to a computer, but there is still software for the machine. The software is called ScanNCut Canvas, and it’s a free cloud-based program.
The software comes with some designs and fonts ready to use, but you can import other file formats such as .JPG and .SVG. These file formats can then be converted to .FCM, where they can be downloaded to a USB drive and uploaded to the Brother machine.
Tracing JPGs can be more complicated than shown in the video below, but there are tutorials you can find online.
Overall Review
The Brother ScanNCut has some features that no die cutting machine on the market has. The scanner is quite useful, and so is the ability to draw seam allowances and create sewing guides. Even though it’s stand-alone, it comes with the free online Canvas software and the ability to work with USB drives.
One of the cheapest places to purchase the machine is from Amazon, as it comes with free shipping. Click below to check the price!
The KNK Zing Air is a robust and strong machine. With 750 grams of cutting force, it’s over 3 times stronger than the Silhouette Cameo, and it has a 14-inch cutting width. This machine is quite versatile. It can not only cut and draw, but score, emboss, engrave and pierce. The precision of this machine is outstanding. Users are able to cut intricate tiny snowflakes only several millimeters wide. The KNK Zing Air is rugged and made almost entirely from high-quality metal. Expect this machine to last a very long time.
The KNK Zing air is surprisingly compact, considering it has a 14″ cutting width. The machine is less than 2 feet wide, 4.75″ tall, and 6.25″ deep. In some aspects, it’s more simplistic compared to other machines. For example, there’s no button to automatically load and unload the cutting mat. The mat must be manually fed into the machine before you start. The blade holders don’t have any “fixed” settings. These little things may seem like a hassle if you’re used to more plug and play type machines, but there is something to say about simplicity. The user has more control over the machine.
Here are some key features:
Wireless Bluetooth – forget about cluttered wires.
Print and cut with laser alignment.
Bundled with Make The Cut software allowing for custom designs.
ZingSpeak – all controls can be voice controlled.
Hold 12″ and 4″ vinyl without the need of a cutting mat.
Check out the demo of the KNK Zing in action:
Materials
Here are some of the materials the KNK Zing Air can cut:
vinyl
cardstock
fabric
felt
leather
magnet
thin chipboard
rhinestone rubber
craft plastic
balsawood (1/16″)
Using the machine
The machine itself is simple, but like all machines, it takes some practice. You do have a lot of control over the KNK Zing, but with more control comes more learning. One drawback of the Zing in particular, is that it doesn’t have a pause button. If you wish to stop cutting, you have to flip the power switch.
Cutting
The machine comes with two types of blades, a regular cut blade and a deep cut blade for cutting thicker materials. They are both color coated to tell them apart. It also comes with a test pen to help you practice before you cut. This machine is so precise, you can cut tiny detailed designs only millimeters thick without any tearing or rough edges. The blade must be adjusted manually. There are no numbers or “clicks” on the blade. You simply turn it to increase or decrease the depth. Not everyone likes this, as you have to figure out the blade depth each time you cut a different material, which may be frustrating.
Print and Cut
The Print and Cut feature is excellent. The machine has laser technology for alignment. The blade starting position can be precisely set manually, so you can be sure it will cut right every time. The Print and Cut feature cuts designs without leaving any unwanted edges. It’s really impressive.
Drawing
What’s also neat about the Zing is that you can attach your own drawing pens or markers. Some other machines require you to purchase specific pens and markers, but not the Zing. You can experiment with ballpoint pens, glitter pens, pencils, permanent markers, and more.
Embossing
To emboss, the KNK embossing tool is required. The tool may seem pricey at $35, but you don’t have to buy a separate embossing machine or dies. The embossing tool has two embossing balls at either end. One end is for embossing paper and cardstock, and the other end is for making creases.
KNK Zing embossing tool
Engraving
Like the embossing tool, you’ll need the KNK engraving tool if you wish to engrave. The diamond tip engraving tool will engrave vellum, foils, acrylic, and most metals, including trophy labels, dog tags, and jewelry charms.
KNK Zing engraving tool
Make The Cut software
The KNK Zing uses Make the Cut software, which allows you to create your own designs or download them. The software is also compatible with Mac.
The software doesn’t physically come with the KNK Zing with purchase, but you will receive an activation code, allowing you to download the software without making additional payments.
You can import a variety of files into the software, including any GSD, WPC, AI9, PS, EPS, SVG, TTF, OTF, PDF or SCUT File. The Zing also cuts from Artistic Suite. If you’re not importing files, use can use convert raster images (PNG, GIF, JPG, etc.) to cuttables.
Support
KNK support is second to none. The staff is extremely helpful and actually enjoy helping you. They answer emails, phone calls, and reply to message boards. If you have a question about cutting a material, they will even offer to cut the material for you before you even purchase the machine, and even record a video of it. That is service!
There is a wealth of information online, including a very helpful interactive online manual and online support groups to get help and share project ideas.
Overall Review
The KNK Zing Air is a versatile machine, being able to not only cut a wide range of materials, but be able to draw, emboss, and engrave. This opens up whole new possibilities beyond scrapbooks and home decor. The machine is well constructed and will last a long time. One of the biggest downsides to the machine is the learning curve, particularly with adjusting the blade and learning the Make The Cut software. This is not a “plug and play” machine, but if you are patient, it can do a lot.
Have questions? Leave a comment. We would love to hear from you!
The Cricut Expression 2 is a fun machine. It doesn’t require a computer, which means you can move it from room to room or travel with it without having to lug your computer around with it. It’s decently powerful, and it can cut more materials than the Silhouette Cameo from 3/4″ to 23.5″. However, unlike the Silhouette Cameo, you cannot design your own custom designs. The Cricut Expression 2 is purely cartridge based.
UPDATE: The Expression is no longer being made by Cricut. Cricut has two amazing newer machines that boast more features and functions. Learn about the Cricut Explore Air 2 and the Cricut Maker in my in depth reviews or check out my comparison of these two machines, Cricut Maker vs Explore Air 2.
The Cricut Craft Room software is also no longer accessible. It has been upgraded and replaced with Cricut Design Space you can learn more about it in my article.
Here are some of the features of the Cricut Expression 2:
Full-color LCD touch screen to move and manipulate images – no computer required
Connects online to the free Cricut Craft Room Software where you can browse thousands of images
Cut or print images from ¾” to 23 ½ (larger 12″ x 24″ mat sold separately)
Compatible with all Cricut cartridges (Imagine cartridges will only cut images, not print)
Cricut Sync software allows for free Expression 2 updates
Using the Cricut Expression 2
Using the Cricut Expression 2 is pretty simple once you familiarize yourself with the controls. Designs are selected by plugging the cartridge into the machine. Designs can then be moved around and resized. There are a few helpful options. The Auto-Fill option, once selected, automatically copies the shape onto the mat as many times as possible at the selected size. This feature is great if you want to cut a few dozen identical shapes for a party. You can even tell the Expression to pre-load mats to be cut. This means as one mat is being cut, you can prepare the next mat and simply switch out the mats when one is done cutting. These features help save paper and maximize time.
Check out the quick view guide:
https://www.youtube.com/watch?v=Uw7V7uWtWQE
Cartridges
The Cricut Expression 2 is a purely cartridge based system. This means you cannot create custom shapes with the machine, as they must come from the cartridge. Cartridges are typically “theme” based and come with about 50 different shapes. There are literally thousands of shapes you can use. Cricut even has shapes that are Licensed by Disney, which is fun for the kids. The Expresison 2 can also take Cricut’s Imagine cartridges. The other downside to using cartridges is the cost. Cartridges can range anywhere from $15-$100. After purchasing a few cartridges, the price can quickly add up. Even if you want a single image from a cartridge, you have to buy the whole thing. Waiting for sales or shopping around will save you some money. One advantage to being able to use cartridges is that there is no need to use a computer. You can even share physical cartridges with friends, which is another advantage.
The Expression 2 comes with two built-in cartridges that include images and fonts, so you’ll be able to use your machine right out of the box.
With the Cricut Expression 2, you can even “weld” multiple shapes together to make 1 shape. For example, if you have a shape of a snowman, and a shape of a hat, you can weld the two shapes into one.
Cricut Craft Room Software
A computer isn’t necessary to use the Expression, but you can connect it to the computer to use the Cricut Craft Room Software. Using the Craft Room software is convenient, as you can set up and choose your designs on the computer rather than the screen on the machine. The software does require an internet connection and you have to create an online account. Once your account is set up, you can link up your physical cartridges to your online account, so you don’t need to plug them into the machine each time. Using the Craft Room, you can even browse digital cartridges to buy.
Digital cartridges are cheaper than physical cartridges, which is another way to save money. You can also buy a subscription. At either $9.99 a month or $99.99 a year, you have access to over 25,000 shapes.
Once you have linked a physical cartridge to your online Craft Room account or Gypsy, the cartridge can no longer be linked to any other online account or Gypsy. Keep this in mind if you are sharing or buying/selling cartridges.
What can the Cricut Expression 2 cut?
The Cricut Expression 2 can cut a variety of materials including:
Vinyl
Light, medium and heavy cardstock
Cricut stencil Material
Fabric including felt (use with fabric stabilizer)
Foam
Cricut magnet material
Cricut stamping material
Chipboard
Balsawood
For heavier materials, such as magnet, stamping material and chipboard, you’ll need to use the deep cutting blade.
What’s also neat about the Expression is that it can also draw. The blades can be replaced with drawing pens and markers. This is great if you are making invitations, cards, or addressing envelopes to give it that professional, handwritten feel.
Maintenance, Warranty, and Support
As you use your Cricut machine regularly, you’ll notice that the blade becomes dull. Once this happens, the blade will need to be replaced. It’s also a good idea to keep the blade and blade housing clean. With cutting mats, they will lose their stickiness with repeated use. Check out our tutorial on cleaning and restoring cutting mats,
The machine comes with a 1-year limited warranty.
Generally, most users are happy with the machine. There have been a few users who have had poor experiences with the machine and have experienced less than ideal product support from Cricut. Returning defective machines, in particular, have been quite the hassle, as shipping labels take a long time to arrive. When returning defective products, users have had much better experiences returning the machine to Amazon where they purchased the machine.
Overall Review
The Cricut Expression 2 cutting machine isn’t for everyone. If you are looking to create your own custom designs, then the Expression 2 isn’t the machine for you. However, there are still tens of thousands of shapes to choose from in the Cricut Craft Room software. Before one purchases this machine, they must consider the cost of added cartridges or a subscription to the Craft Room Software.
Cost aside, the machine is fun and doesn’t require a computer, which is better for kids. It’s relatively powerful and can cut through materials such as chipboard, balsawood, and magnets.
Update: The latest version of the Silhouette Cameo is the Silhouette Cameo 4. We did a full review of the Silhouette Cameo 4, going over its features, benefits, pros, and cons. This review refers to an older version of the Cameo.
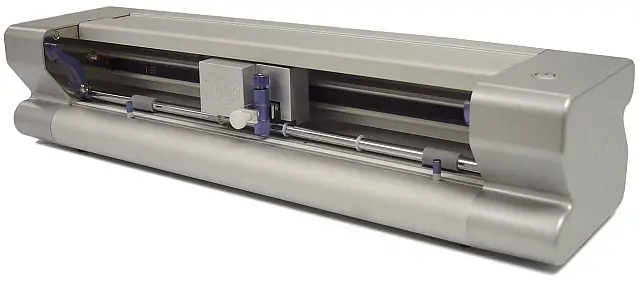
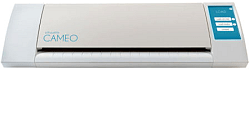
Oh, the Silhouette Cameo! The Silhouette Cameo has had a strong following for being one of the more popular electronic die cutting machines. It’s not as strong as some of the other cutters on the market, but it can do a pretty good job at cutting vinyl. It can cut and draw, and all has some other cool features such as PixScan technology. In this review, we will be going over all the features, benefits, and pros and cons of this cutting machine. Let’s get started!
The Silhouette Cameo has a sleek and appealing body that’s roughly the size of a printer. The machine isn’t heavy, but does require a computer connection for the most part, so you probably won’t be moving the machine around too much. The Cameo does come with the ability to print off saved files stored on a USB drive, which is a handy feature if you happen to be traveling or having a craft meetup.
Here’s a list of features:
12-inch cutting and drawing width
Full-color LCD touch screen for navigation and use. This touch screen allows you to choose between languages, set the sleep time, change the color scheme, display help icons, and even view a tutorial.
PixScan™ technology compatibility
PC and Mac compatibility
Matless cutting capability to cut materials up to 10 feet long
Handy on-unit cross cutter for cutting materials fed directly from a roll.
Built-in accessory storage unit to store spare blades.
Using the Silhouette Cameo
Starting out with the Silhouette Cameo takes some patience. Some users are able to catch on quickly, but others may become frustrated. If you are somewhat tech savy or have design experience, you’ll be able to catch on quick. Before you start creating your own designs, you must first install the Silhouette Studio Designer. This is a relatively easy and quick process, and the software can be downloaded from Silhouette’s website (Silhouette Studio Designer download) so you can familiarize yourself with the software before you purchase the machine. After the software is installed, you can either create your own designs, import them, or purchase them online (more on that later).
After you have selected an image in the software, you can move it around your virtual cutting mat. This virtual cutting mat will correspond to where the material will be cut on your real cutting mat. The cutting mat comes in two sizes, 12″ x 12″ and 12″ x 24″, which means you can cut material up to 12″ wide.
The purpose of the cutting mat is to hold the material in place when being cut, so it doesn’t slide around. Not all materials need a cutting mat, however, and if you aren’t using a cutting mat, you can cut materials up to 10 feet long. This is useful when cutting long pieces of vinyl, and the Cameo comes with a built-in cross cutter to help cut appropriate sized sheets for the machine.
Many users find new cutting mats to be too sticky. To make the mat less sticky, press a t-shirt or pillow on the mat. If you find the mat to be not sticky enough, consider spraying Krylon Easy Tack Spray on the mat to make it sticky again.
Before you load the mat and material into the machine, you’ll want to adjust the blade depth and cutting speed. The blade depth must be adjusted manually. This is easy and simple to do. The blade must be taken out of the blade holder, and turned using the ratchet on the machine. The cutting speed is adjusted using the software. Once everything is set, you are ready to cut.
Print and Cut
One neat feature that the Cameo has is the Print and Cut feature. This is a feature that allows the Studio software to send an image to your printer to be printed. The image will be printed with registration marks along the sides. One the material is printed, it can then be loaded into the Cameo. Before the Cameo starts cutting, it will detect where the registration marks are and know where to cut around the printed image.
Here is a Print and Cut demo:
PixScan Technology
Similar to the Print and Cut feature, the Cameo comes with PixScan technology. Instead of printing an image with registration marks, materials can be placed on the PixScan cutting mat. This mat has registration marks. Once the material is placed on the mat, a picture can be taken from your camera or smart phone, and uploaded to the design studio, where the trace lines can be created and then cut.
Blades
Once you start using your machine regularly, the blade will become dull and may not cut properly. If this happens, the blade should be replaced. How quickly the blade dulls will depend on use and the material being cut. Some materials dull the blade quicker than others.
Some users have reported receiving defective blades with the purchase of their machine. If this is the case, contact Shilhoutte’s Customer Support to receive a new blade.
Once the blade is set, the cutting mat can then be loaded into the machine and the material cut.
These instructions may seem simple, but it will take some time to learn the software and which blade depth and cutting speed to use for what material. For example, users generally have better cuts using heavier cardstock than lighter cardstock. After you have purchased your machine, spend a few days practicing cutting materials.
For more important or expensive projects, it’s safe to do a practice cut first, to make sure the settings are correct.
What can the Silhouette Cameo do?
The Cameo has a cutting force of 210 grams. This lags behind in comparison to other digital die cutting machines such as the Cricut Explorer. The Cameo won’t be able to cut balsawood or thin sheet metal, but it’s perfect for scrapbooking, card making, and vinyl projects.
Cutting Materials
Here are some materials that the Silhouette Cameo can cut:
Paper/Cardstock up to 350 gsm thick.
Tissue paper
Vinyl
Iron-on transfer
Cereal box chipboard
Craft foam
Light weight fabric
Rhinestone template material
The Studio software does come with a ‘double cut’ feature, which will help with thicker materials.
Drawing
Besides cutting, the Silhouette Cameo can also draw. The blade can be replaced with a pen or marker to draw designs on various materials.
What’s pretty neat about the drawing feature is that you can actually draw words and phrases. This is fun for creating personal invitations to address envelopes. Sketch pens even come with glitter.
Silhouette Cameo Sketching
What about creating designs with the Silhouette Cameo?
The great news about the Cameo is that there is no need for expensive cartridges! Cartridges can range from $15-$75 dollars. It’s awfully inconvenient to have to buy an entire cartridge for only a few images. The cost can quickly add up and they require storage.
With the Silhouette Cameo and their Studio software, the software allows the user to buy, import, or create their own designs. The software is compatible with Windows Vista and higher, and Mac OSX 10.6.8 & higher. If you are a graphic designer, you’ll feel more comfortable using this software. If you aren’t as computer savvy, there are lots and lots of resources and videos to help guide you.
If you won’t be creating your own designs, you can import files that you have on your computer, which could have been found online. The Studio Software comes with a trace tool so you can import an image and have the software auto-detect the outline to cut as a design.
A third way you can use images is by buying them from the Silhouette Design Store. Most designs are 99 cents. Along with the 100 free designs that come with the software, every week, the Design Store releases a free design as well. Designs that you purchase are stored in “the cloud”, so if your computer crashes, you can download your purchased designs to your computer again at no extra charge.
You also receive 1 month Basic Subscription to the Silhouette Design Store with the purchase of your machine. That’s $25.00 monthly credits to download the designs you want. The subscription plans allow users to pay a monthly price for credits to use at the Design Store. There are many subscription plans, for 3, 6 and 12 months, ranging from $5 a month to $100 dollars a month, so you can pick the subscription you want. This is a good option to save money if you plan on buying a lot of designs.
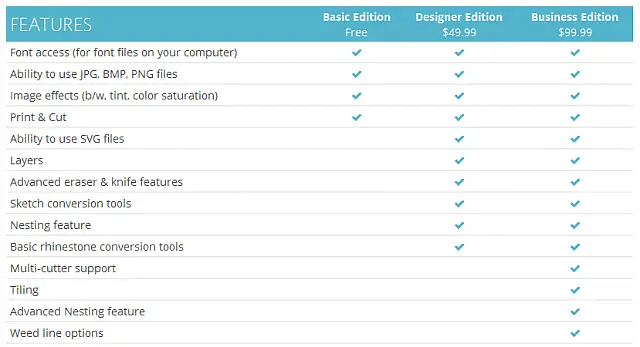
The basic version of the Studio Designer is free. If you would like to have more software features, you’ll need to upgrade. See the chart below for what features come with the different versions.
Silhouette Cameo Studio Designer Editions
If you upgrade to the Designer Edition, you’ll be able to use SVG files. There are many websites online where you can download SVG files for free.
If you are working with larger files, the software may run a little slow, even on current machines.
Some users have experienced trouble cutting after the V3 software update. If this is the case, you can always download previous versions of the software.
There is another Silhouette program called Silhouette Connect. Silhouette Connect gives you the ability to send projects you’ve designed in Adobe Illustrator or CorelDRAW straight to the machine without the need to convert them first to a Silhouette Studio compatible format. The license key to use Connect cost $39.99.
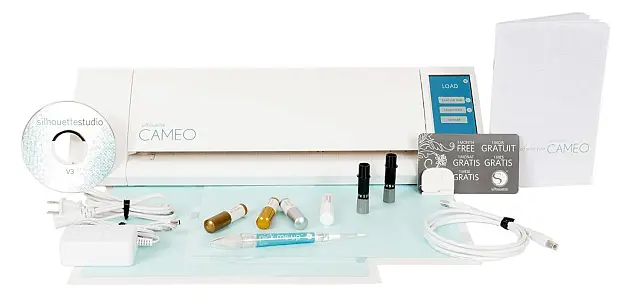
What’s included with the Silhouette Cameo?
Here is what is included in the box:
Silhouette Cameo electronic cutting tool
Silhouette Studio software
Power cable, USB cable
Basic instruction manual
12-inch cutting mat
Cutting blade
One-month basic subscription to the Silhouette Design Store
Crosscutter
100 free digital designs
Maintenance, Warranty, and Support
There is some maintenance required with the Cameo. The blades will become dull and the mats less sticky. There are tricks for making these last longer, such as using a separate blade for cutting fabric or spraying the mat with a sticky adhesive.
When cutting, tiny debris will get stuck inside the blade housing. To clean the blade, the tip of the blade housing unscrews, exposing the blade to be cleaned. Some use toothbrushes to clean the blade, while others use canned air.
The Silhouette Cameo comes with a 1 year limited warranty for US and Canadian customers only.
Silhouette support has been mixed from both extremes. Some users have had quick and painless customer support, while others haven’t had good experiences.
There are though lots and lots of community resources online to help you out, ranging from forums to yahoo and Facebook groups. There are thousands of enthusiastic and helpful users who are ready to help answer your questions. There are also video tutorials on youtube to teach you hot to get started and how to create fun projects using your Cameo.
Overall Review
Overall, the Silhouette Cameo isn’t a versatile craft machine, as it can only cut thinner materials, which may be fine depending on what projects you will be creating. Some users don’t have a need to cut leather or balsawood.
One main advantage to using a Cameo is being able to create, import, and purchase designs to be cut. There is no need for expensive cartridges and you can cut any design you want.
Physically the machine is well built and the touch screen is a nice feature. The Cameo also has a strong community for getting help or project tutorials.