
Many Cricut Explore Air 2 owners have wondered if they are able to emboss with their Explore machine. Well, the answer is yes and no. Officially Cricut doesn’t have any specific embossing tools for the Explore family of machines. The Cricut Maker does have a “debossing” tool but it is not compatible with the Explore Air 2.
Fortunately, there are ways around this limitation and you can achieve both heat embossing and dry embossing with your Cricut Explore cutting machine. If you aren’t sure what embossing is, it is a technique that adds a raised surface to a material, often giving it a “pop” effect. It’s a fun and creative technique that you can add to making cards and scrapbooking.
Heat embossing, or wet embossing, uses a combination of “sticky” ink and embossing powder which is then heated, melting the powder together to create a cool glossy effect on your project.
Dry embossing uses a stylus to press a design from a stencil into your material, usually paper, to create a raised effect. This technique is usually done by a manual machine with an embossing folder or by hand with a lightbox, stylus and brass stencil.
Cricut Sales! Save up to 50% OFF on Materials and Accessories. Plus, get up to $150 off Machines and Heat Presses!
Check Out the Current Deals
Get Free Shipping with Code JANSHIP
How to Heat Emboss with the Cricut Explore
Heat embossing is actually fairly easy to do with the Cricut Explore Air 2. All you really need are some specific tools, a cool design, paper (cardstock works best) and to work fairly quickly.
Required materials
Let’s get started with the required materials. To emboss with your Cricut Explore, you will need the following:
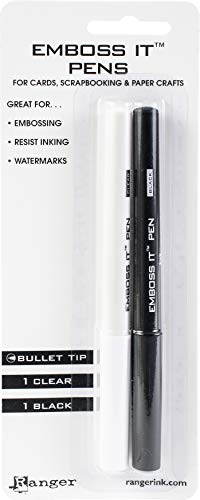
Ranger Embossing Pen – This is an embossing pen that fits perfectly in the Cricut Explore. There are two pens in each pack, a clear pen, and a black pen. The clear won’t show up in the background, but if you do want a darker background, use the black.
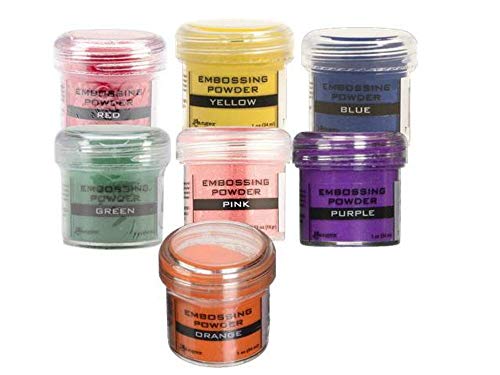
Embossing Powder – This is the powder that you will apply on top of the embossing “ink”. You can either buy a bunch of different colors in a bundle or buy individual colors. I like to buy the bundles, as I don’t always know what color I want.
Heat Gun – This will provide the heat to melt the powder to the embossing ink. This can also be used for drying paint, shrink wrapping, and lots more uses.

I highly recommend buying a heat gun if you plan on doing more than the very occasional heat embossing project. A hair dry doesn’t really get hot enough and if you use it on the front side of your project it will just blow your powder everywhere.
You can try a straightening iron and carefully hold your project above the hot plate being careful not to touch you project directly to the hot surface so you don’t burn it.
Tip: You can buy everything together in a bundle which might save you some money. Check out the bundle on Amazon.
Guide to Embossing with your Cricut Explore
Now that we have gone over the required materials, we can now start embossing. See the video or follow the directions below.
- Pick a cool design that can be drawn with your Cricut Explore Air 2, make sure you have set your design to “write” instead of “cut”
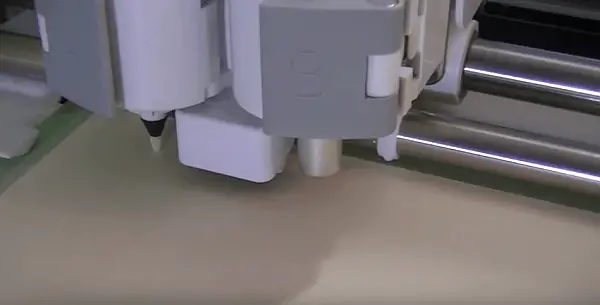
- Insert the embossing pen into your Cricut Explore, where you would normally insert any colored pen.
- Start printing! If you are printing with the clear embossing pen, you won’t be able to see it while the Cricut is working.
- Once done, remove the material from the machine and generously sprinkle the embossing powder onto the material. Use a paper underneath to catch the powder, so that you can funnel it back into the container and not waste any excess. Make sure you only have embossing powder where your design is supposed to be. It’s next to impossible to remove once the powder has melted.
- Use the heat gun to melt the powder to the material. Once the powder is melted, it should look shiny. Make sure you don’t overheat. It’s pretty easy to see the powder change from solid to a liquid look.
Wet embossing can add a very cool effect to your projects. It works best on non-porous materials like flat paper and cardstock. If you have your heart set on trying heat embossing on fabric, check out this super cool project using you cutting machine to make a stencil, modge podge and embossing powder to make a t-shirt.
How to Dry Emboss with the Cricut Explore
Dry embossing, or flat embossing, with the Explore Air 2 is a little more difficult than wet embossing. It depends on what type of effect you are trying to create but if you want the full embossed look it’s will take some practice.
You’ll need a Cricut Stylus in order to make the embossing effect. You can simply use it to score the lines of a design into your material if that’s the look you are going for. It’s fun to play with to see if you can get the desired effect you want by just having the stylus “write” the design for you.
To get the true dry embossed look it gets a bit more complicated and I haven’t personally tried it myself. But CleverSomeday has figured out how to do this and has some great step-by-step instructions on how to do this yourself.
This first video will walk you through the process of how to set up the machine and use a cutting file she has pre-made. It also goes into detail on the materials you need to make it happen but in short, you need the following (all of which are available on Amazon or at your local craft store):
- Cricut Stylus
- Cricut Pen
- Heavy Cardstock for the stencil
- Light to Medium weight Cardstock for the card or final product
The second video walks you through creating the stencil, cutting and scoring files so you can create your own unique embossed designs. It does use SureCutsALot4 (SCAL4) in the video but the principles can be applied to SCAL5 or other design software with a bit of tweaking.