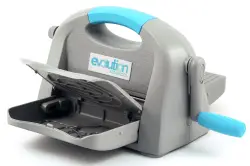
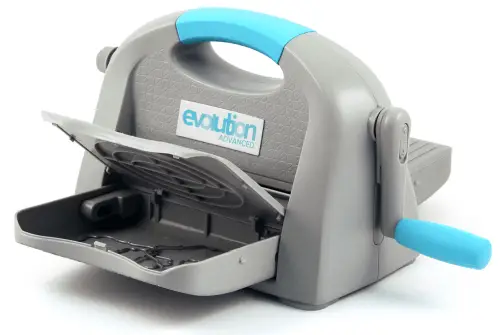
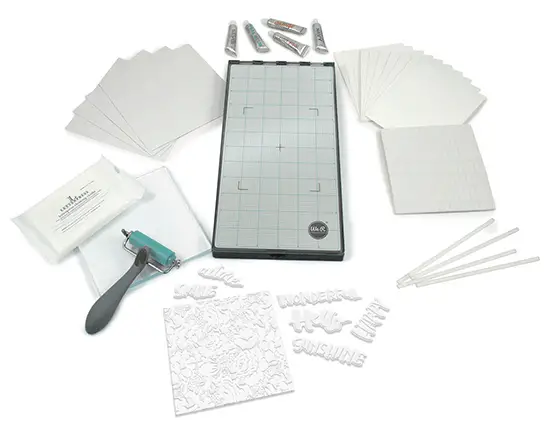
One of the more interesting machines on the market today is the Evolution Advanced Die Cut Machine by We R Memory Keepers. The Evolution Advanced machine, like most die cut machines, cuts and embosses, but also has some unique features not found on most machines. For one, the machine has a knob to adjust the height of the rollers, allowing you to use the same sandwich on various dies or change the embossing depth. Another feature is that you can remove the handle and attach a motor. Let’s see what the Evolution Advanced Machine is all about…
The Evolution Advanced machine can not only cut and emboss materials up to 6 inches wide, but it can also letterpress. The machine is lightweight and portable. Similar to the Cricut Cuttlebug, the sides fold up, and when the sides are folded down, the machine suctions to the table, providing strong support when running sandwiches through the machine.
Along with the machine being small and compact, it also comes with room for storage. The sides of the machine open up, providing room to tuck away dies, tools, and material. The sides can be a little tough to open, so if you have weak hands or arthritis, you may not want to use these storage compartments.
Here is great video overview on how to use the Evolution Advanced die cut machine from Scrapbook.com:
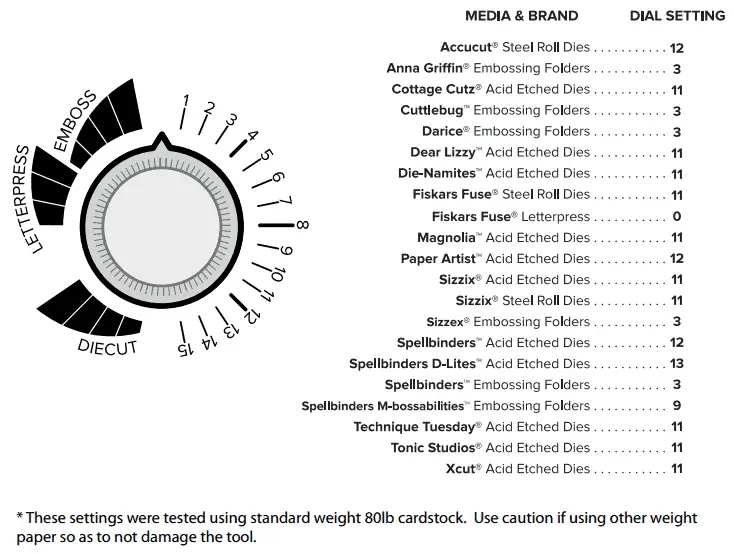
What makes the Evolution Advanced machine so unique is the dial setting. The dial setting is a dial located on the side of the machine which adjusts the height of the rollers. By adjusting the dial, you can set the pressure, eliminating the need for confusing mat combinations and shims.
Some users with weak hands and arthritis found the dial difficult to move. Some users have used WD-40 to make using the machine easier.
Below is the dial setting guide, which shows which dial setting to use with various dies and folders from other manufacturers. It’s important to note, however, the guide may not be accurate if you are using a material other than 80lb cardstock. Figuring out the right dial settings may take some experimentation.
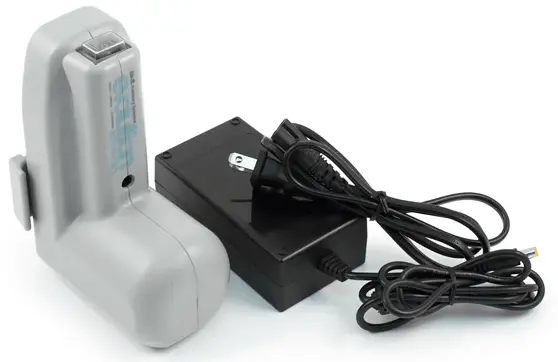
Electric Motor and Handle
The Evolution Advanced machine is the only machine that can use both a handle and a motor. The handle can be easily attached and removed from the machine without using any tools. Unlike other machines that require an Allen wrench to attach the handle, the handle for the Evolution Advanced machine has a sliding locking mechanism instead. When the handle is not being used, it can be stored in the side storage compartments. This is also where the handle will be when you purchase the machine.
Evolution Advanced Motor Attachment
For those with arthritis or doing large projects, a motor attachment is available. The motor attachment easily attaches to the machine in place of the handle. The motor plugs into a wall outlet and is activated when the button on top of the motor is pressed. This means you must hold the button down when cutting, and release to turn off the motor.
Letterpressing
Letterpressing is the process of creating a debossed impression with ink. Cotton paper works especially well to absorb ink and to create depth. We R Memory Keepers sells a letterpress kit (sold separately) that works with the Evolution Advanced and includes everything you need to get started. The reviews, however, are mixed. Some users have experienced the letterpress plate crack and even shatter. This is in part due to using material that is too thick or using the letterpress base in other machines other than the Evolution Advanced. If you do decide to use the letterpress kit, be careful not to force anything through the machine.
Evolution Advanced Letterpress Kit
Overall Review
The Evolution Advance machine is a neat die cut machine that is unlike other die cut machines on the market. The machine is light and compact, and along with its built-in storage, makes it great for traveling and space savings. It works with many dies and embossing folders on the market, and thanks to the dial setting, there is no need to constantly swap plates and shims trying to get the right thickness. The motor attachment is great for those for larger projects or for this with hand pain. The letterpress kit, however, had some mixed reviews with users experiencing cracking in the plates.
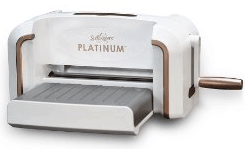
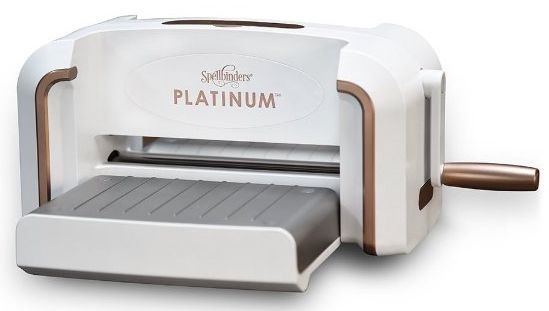
The Spellbinders Platinum machine is a strong and elegant die cut machine that can cut and emboss. It comes in two sizes, an 8.5″ cutting width model, and a 6″ cutting width model. The Spellbinders Platinum machine is the first Spellbinders machine that can take wafer-thin dies and steel rule dies, including steel rule dies from other companies such as Sizzix.
The Platinum machine is a big move forward for Spellbinders. The machine’s outside is plastic, and the inside solid steel, which makes the machine super strong and heavy. You won’t have to worry about the gears breaking in this machine. Due to its weight, it takes a little more effort to move around, but it does prevent the machine from wobbling when cutting material. Along with being on the heavy side, it also has a larger footprint, which isn’t necessarily a bad thing as long as you have space. The sides fold up making the machine more compact when not in use, and it has a carrying handle to help you move it around.
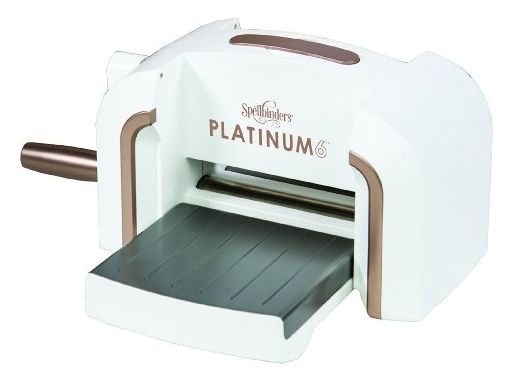
Spellbinders Platinum 6 Machine
There two models of the Platinum machine, the full-size model, which has an 8.5″ cutting width, and a smaller model, called the Platinum 6, which has a 6″ cutting width. If you are using the full-sized model, you’ll be able to cut full-sized paper. It should be noted that the full-size model comes with standard cutting plates, which are 6 inches wide. If you wish to cut the full width of the machine, you’ll need to purchase the X-Large cutting plates. If you order them from the Spellbinder’s website, they will give you the X-Large cutting plates for free.
Spellbinders Platinum vs Grand Calibur
The Spellbinders Platinum machine is a big upgrade from the other Spellbinder machines, such as the Spellbinders Grand Calibur. The Spellbinders Platinum machine differs from the Grand Calibur machine in a few big ways. The Platinum machine’s core is constructed from solid steel, making it more durable and heavier. Having the gears break in the Grand Calibur was a common problem, which has now been eliminated in the Platinum machine. Another difference is the Platinum machine has platforms that fold up, which makes it easier to create your sandwich and send it through the machine. The platforms also fold up, saving space. And lastly, the Platinum machine can take steel rule dies, allowing you to cut more kinds of material.
What can the Spellbinders Platinum Machine Cut?
The Platinum machine cuts over 40 different materials of varying thickness and can cut up to 8 layers of some materials in a single pass using the steel rule dies. The number of layers you will be able to cut isn’t solely dependent on the strength of the machine, but rather the height of the blade and the opening in the machine. You obviously won’t be able to cut 8 pieces of cardboard as it would be too tall for the machine. That being said, the best materials to cut for multiple layers would be thin ones, such as paper and fabric.
Here are some materials that the Platinum machine can cut using the steel rule dies:
Fabric
Heavy Duty
Metals
Paper
– Cotton Fabric
– Balsa Wood
– Craft Aluminum
– Construction Paper
– Burlap
– Bubble Wrap
– Craft Metal
– Cardboard
– Denim
– Cork
– Foil
– Cardstock
– Faux Fur
– Craft Foam
– Tin
– Paper
– Felt
– Magnet
– Poster board
– Flannel
– Pop Up Sponge
– Lace
– Poster Board
– Leather
– Sand Paper
– Pleather
– Screen
– Quilt Batting
– Shrink Film
– Satin
– Styrofoam
– Tulle
– Thin Acrylic/Plastic
– Velvet
– Vinyl
– Wool
*Material can be with or without adhesive backing
Embossing
Both machines can emboss and use embossing folders from other companies. How well the Platinum machine embosses will mostly depend on what kind of embossing folder is being used. Results may vary and take some trial and error. Using a shim may help when using certain folders.
What Comes with the Platinum Machine?
Both machines come with the same items:
Platinum Machine
Operation Instruction Booklet
Two Standard Cutting Plates (standard size is 6″ wide)
One Embossing Plate
One Embossing Mat
Cutting Platform (the platform will be different sizes depending on the machine)
Accessories
There are additional accessories that can be purchased for the machine. One accessory is the magnetic platform which holds the wafer thin dies to the platform, which prevents the material from sliding around. Another accessory is the 3D embossing plate, which is used with the 3D embossing folders. And, if you are creating boxes, you’ll want to use a crease plate.
Final Overview
The Platinum machine is a great machine for cutting. It’s a solid machine that is expected to last a long time. Crafters have different options available in choosing between the two models and using various dies. Not all manual die cut machines can cut full-sized paper. The weight of the machine makes it stable and the sides fold up saving space.
Note: Silhouette has discontinued the Cameo 3 and replaced it with the Cameo 4. The Cameo 4 is more powerful than the Cameo 3 and has upgraded the blade designs. Read more about the Silhouette Cameo 4 in my review.
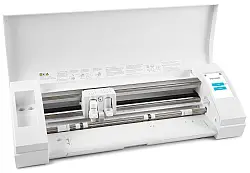
If you are searching for a die cutting machine to cut your own custom designs, the popular Silhouette Cameo die cutter just got better. The Silhouette Cameo 3 is similar to the Silhouette Cameo 2, but has some key upgrades and new features. In this review, we will be going over everything you need to know about this electronic cutter – the pros, cons, and things you should know before you buy the Silhouette Cameo 3.
Some of the new features of the Cameo 3 include dual carriages, Bluetooth, and some upgrades to Silhouette Studio, which is powerful design software allowing users to create their own custom designs from scratch. The Cameo 3 isn’t as powerful as other machines like the Cricut Explore but can cut most paper and vinyl materials just fine. Let’s get started with the Silhouette Cameo 3 Review.
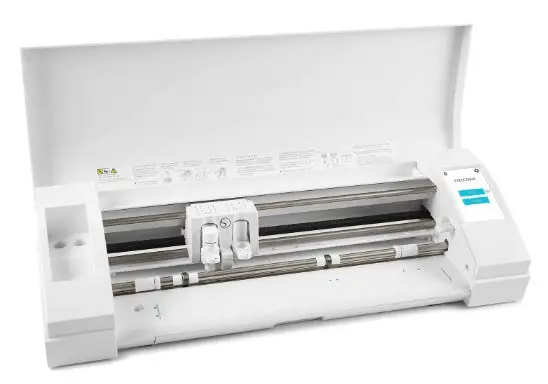
The Silhouette Cameo has everything you would expect from a digital die cut machine. It has dual carriages, Bluetooth technology, a touchscreen, and the all-new Autoblade, which is exclusive to Silhouette.
Here’s a quick overview of features.
Dual carriages to cut and print without stopping.
12-inch cutting and drawing width
2mm cutting clearance to cut more materials
Full-color LCD touch screen for navigation and use. This touch screen allows you to choose between languages, set the sleep time, change the color scheme, display help icons, and even view a tutorial.
PixScan™ technology compatibility
PC and Mac compatibility
Bluetooth enabled to send cut jobs wirelessly
Matless cutting capability to cut lined media up to 10 feet long
Handy on-unit cross cutter for cutting materials fed directly from a roll.
Built-in accessory storage unit to store spare blades.
Dual Carriages
One of the biggest upgrades to the Cameo is the dual carriages. Previously, if you wanted to draw and cut a single project, you had to stop the machine, swap out the blade or pen, then start the job again. With dual carriages, there is no stopping, making things a lot easier. You can either draw with two different colored pens at the same time.
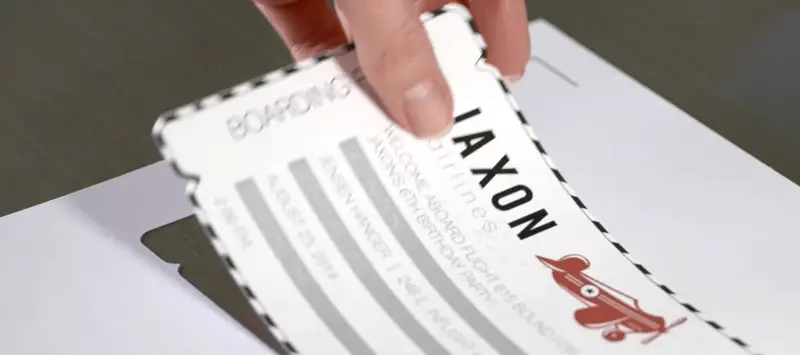
The Print and Cut feature comes standard with all the Silhouette machines. This feature allows the Cameo to cut out printed images. This is ideal if you are cutting things like stickers, labels, tags, gift cards, or invitations so you don’t have to cut them out by hand. Keep in mind you will need a printer to initially print the designs.
How to use Print and Cut on the Cameo 3:
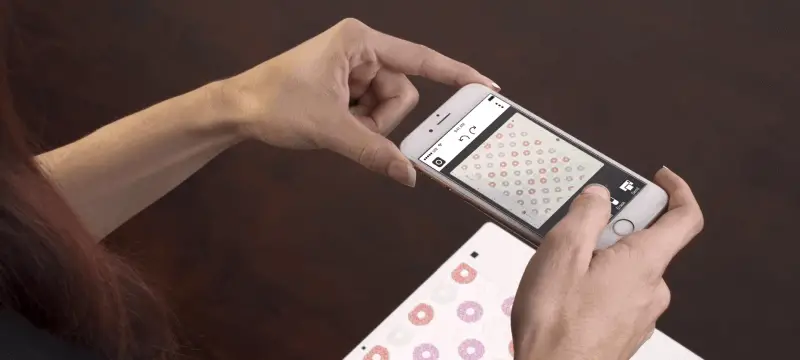
Create or upload the design you want in the Silhouette Studio software.
Tell the Silhouette Studio software to print your image using your home printer
Load the printed image into the Camo 3 and start the cutting job!
What makes it so simple is, when you go to print your image from the Studio software, it will be printed with registration marks. When the printed material is loaded into the machine, the Cameo will use a sensor to detect these marks and know exactly where to cut around the image.
PixScan Technology
Similar to the Print and Cut feature, the Cameo 3 comes with PixScan technology. However, instead of printing the design from a printer, the image is placed on the PixScan cutting mat, where the mat itself contains the registration marks. Once the material is placed on the mat, a picture can be taken with your camera or smartphone and uploaded to the Design Studio software, where the trace lines can be created and then cut.
The PixScan technology is ideal for making patters digital, such as:
Hand drawn designs
Fabric patterns
Stamp patterns
Magazine cut outs
The cutting PixScan mat can be used as a regular cutting mat too, but it’s nice to have a dedicated mat used only for PixScan to make it last longer.
AutoBlade
The AutoBlade is a new blade that comes with the Cameo 3. It automatically adjusts its depth based on the material being cut. This means it saves you time from having to take the blade out and adjust its depth each time you want to cut different material. The way the AutoBlade adjusts itself is by tapping itself in the corner of the machine to adjust the blade before the cutting begins.
A common mistake that is often made is inserting the AutoBlade in the carriage but not locking it in. When you insert the AutoBlade into the machine, make sure the push mechanism is in the lock position. If you don’t do this, you won’t get the right cutting depth.
Other Blades
Besides the AutoBlade, there are a few other blades that can be used with the Cameo3.
Here are all the blades that can be used with the Cameo 3:
Blade
Blade Material
Adjustment
Blade Length
AutoBlade
Sintered Tungsten Alloy
Automated
0.1mm – 1mm
Standard Blade
Carbide
Ratchet
0.1mm – 1mm
Premium Blade
Sintered Tungsten Alloy
Manual/Hand
0.1mm – 1mm
Deep Cut Blade
Sintered Tungsten Alloy
Manual/Hand
0.1mm – 2mm
Fabric Blade
Carbide
Ratchet
0.1mm – 1mm
Standard Blade – Also known as the ratchet blade, can be used for most projects.
Premium Blade – Last 3 times longer than the standard blade.
Deepcut Blade – Can cut up to 2mm. Great for craft foam.
Fabric Blade – Same as the Standard Blade but in a blue housing. Reserved to be used on fabric only to last longer.
Full-color LCD Touch Screen
The touch screen replaces all the buttons on the Cameo 3. It’s here where you can load/unload your mat and even get mini tutorials. If you get stuck, the touch screen helps guide you through the machine. A neat addition is that the Cameo 3 provides audio feedback to help you navigate.
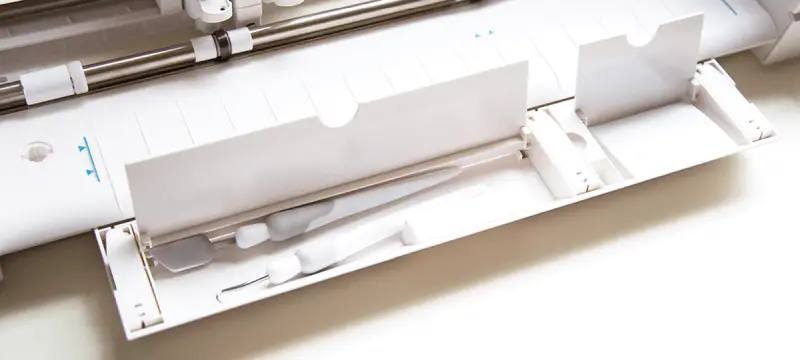
The Cameo 3 also comes with multiple storage compartments to make sure your tools have a nice home. When you open the lid, the left-hand side has 2 slots for your blades. There is also a groove that runs near the back of the machine large enough to hold 10 sketch pens horizontally. And lastly, there is a pullout from under the machine that is separated into two compartments. The left compartment hold tools such as picks and spatulas, while the right compartment is perfect for your cross cutter.
Cut up to 10 Feet Long with the Roll Feeder
One feature that sets the Cameo 3 apart from the rest is the ability to cut up to 10 feet long. If you are making a long banner or large vinyl decal, the Cameo 3 is perfect. What makes this super easy is the Roll Feeder attachment.
The Roll Feeder attachment holds the roll for the material and helps feed it into the Cameo. Not only does this make it easier to feed, but keeps the material straight and prevents it from being crooked.
The Roll Feeder is sold separately and is compatible with the Silhouette Portrait 2.
What Can the Silhouette Cameo 3 Cut?
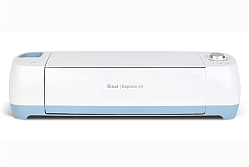
The Cameo has a cutting force of 210 grams. This lags behind in comparison to other digital die cutting machines such as the Cricut Explorer Air. The Cameo won’t be able to cut balsa wood or thin sheet metal, but it’s perfect for scrapbooking, card making, and vinyl projects.
Here are some materials that the Silhouette Cameo can cut:
Paper/Cardstock up to 350 gsm thick.
Tissue paper
Vinyl
Iron-on transfer
Cereal box chipboard
Craft foam
Lightweight fabric
Rhinestone template material
The Studio software does come with a ‘double cut’ feature, which will help with thicker materials.
Silhouette Cameo 3 vs Cricut Explore Air
When buying a die cut machine, a lot of people are wondering what the differences are between the Silhouette Cameo 3 and the Cricut Explore Air. They are the two most popular machines on the market, and for good reason.
While they both have similar capabilities such as dual carriages and print and cut, the Cricut Explore is almost twice as strong and more precise than the Silhouette Cameo. One big difference is the software. If you are an advanced user who wishes to create designs from scratch using the native software, the Silhouette Studio software is more powerful. You do need to pay to upgrade to import .SVG files, however, while it’s free with Cricut Design Space.
See how the Silhouette Came 3 compares to the Cricut Explore Air:
The Silhouette Studio software is free and allows you to either buy, import, or create your own designs from scratch. The software is compatible with Windows Vista and higher, and Mac OSX 10.6.8 & higher. If you are a graphic designer or have previous experience using graphics software, you’ll feel more comfortable getting started with Silhouette Studio. If you aren’t familiar with creating your own designs, there are lots of tutorials and communities that would love to help you.
If you won’t be creating your own designs, you can import files that you have on your computer, which could have been found online. The Studio Software comes with a trace tool so you can import an image and have the software auto-detect the outline to cut as a design.
Another way you can use images is by buying them from the Silhouette Design Store, where most designs are 99 cents. Along with the 100 free designs that come with the software, every week the Design Store releases a free design as well. Designs that you purchase are stored in your online account, so if your computer crashes, you can go back to your online account and download the designs you previously bought at no additional charge.
You also receive 1 month Basic Subscription to the Silhouette Design Store with the purchase of your machine. That’s $25.00 monthly credits to download any designs you want. The subscription plans allow users to pay a monthly price for credits to use at the Design Store. There are many subscription plans, for 3, 6 and 12 months, ranging from $5 a month to $100 dollars a month, so you can pick the subscription you want. This is a good option to save money if you plan on buying a lot of designs.
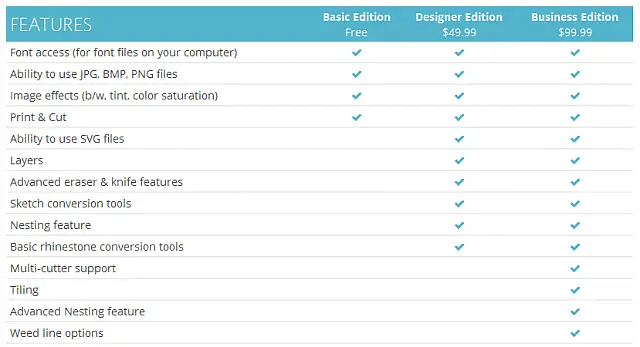
The basic version of the Studio Designer is free. If you would like to have more software features, you’ll need to upgrade. See the chart below for what features come with the different versions.
Silhouette Cameo Studio Designer Editions
If you upgrade to the Designer Edition, you’ll be able to use SVG files. There are many websites online where you can download SVG files for free.
If you are working with larger files, the software may run a little slow, even on current machines.
There is another Silhouette program called Silhouette Connect. Silhouette Connect gives you the ability to send projects you’ve designed in Adobe Illustrator or CorelDRAW straight to the machine without the need to convert them first to a Silhouette Studio compatible format. The license key to use Connect cost $39.99.
Maintenance, Warranty, and Support
There is little maintenance required with the Cameo beyond the normal blade changes and getting new cutting mats.
The Silhouette Cameo comes with a 1-year limited warranty for US and Canadian customers.
Silhouette support has been mixed from both extremes. Some users have had quick and painless customer support, while others haven’t had good experiences.
There are though lots and lots of community resources online to help you out, ranging from forums to yahoo and Facebook groups. There are thousands of enthusiastic and helpful users who are ready to help answer your questions. There are also video tutorials on youtube to teach you hot to get started and how to create fun projects using your Cameo.
Overall, the Silhouette Cameo 3 isn’t the most versatile craft machine, as it can only cut thinner materials. This may be fine depending on the type of projects you will be creating. Some users don’t have a need to cut leather or balsa wood. It does have all the features that we can expect from a die cut machine in this price range, having dual carriages and Bluetooth functionality. One main advantage of using a Cameo is that it can work without the internet and has powerful software for creating custom designs.
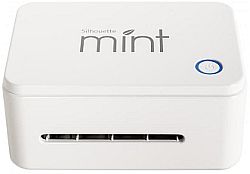
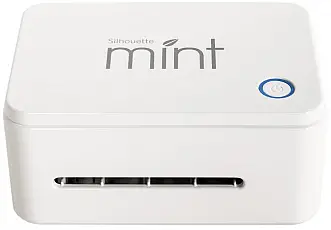
Silhouette Mint Review
The Silhouette Mint is a specialized machine for producing stamps with the help of thermal printing abilities that result in 3D designs. The system is powerful and customizable, combining a small and easily transportable machine with software, allowing you to create your own stamps in a matter of minutes for use in all your projects. The Silhouette Mint not only allows you to make your own stamps easily, but also comes with custom software, Mint Studio, which makes designing super simple.
With the Silhouette Mint, you make custom 3D reliefs of your design, which are printed on stamp sheets and attached to stamp bases. This industry-standard machine and software set enables a straightforward four-step stamping process: designing the pattern, printing or “minting” the stamp, inking it and stamping it on your projects.
After you print the stamp, you use the specialty Silhouette Mint inks to add color to your designs. Then you apply ink to the stamp then wait 10 minutes to make sure ink gets into all the design details for full effect. Before stamping on your actual project, use scrap paper to remove extra ink from the stamp. Then you can start stamping. Below we’ll go into this in more detail.
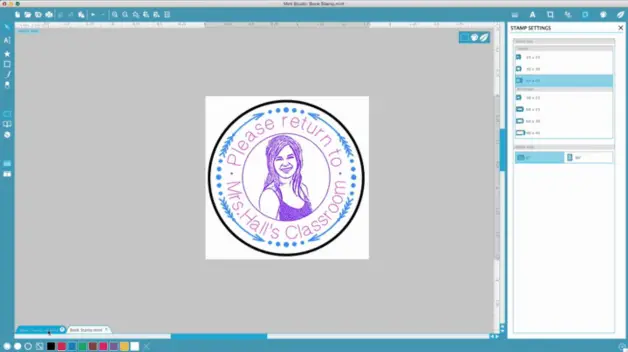
Designing the Stamp
The first step in the design process is to hook up the machine. Connect the Silhouette Mint to a power outlet with one cord and to your computer with a USB cord. Then open the Mint Studio software and start designing, choosing shapes and fonts and more right within the software. Or you can import designs you’ve already made into the system.
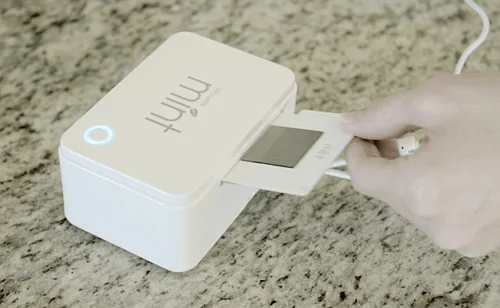
“Minting” the Stamp
Once your design is complete, it’s time to send it to the machine for printing. Special stamp sheets feed through the stamp machine, which prints the image on them in reverse using thermal printing capabilities. The light on top of the Silhouette Mint will blink while it is printing the stamp, then stop when the stamp is ready. You then mount the newly created stamp on a stamp base (one of which comes with the kit, others of which are available for order separately). The stamp is ready for inking and stamping in all your projects.
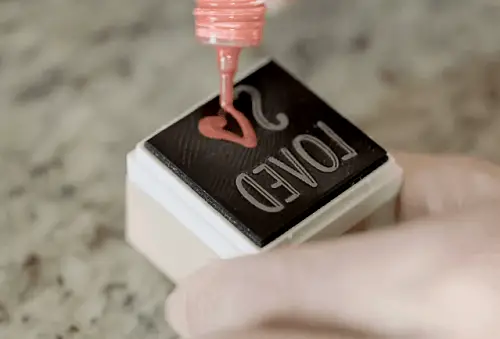
Unlike traditional stamps, you don’t simply press these stamps against a stamp pad to soak up ink. Rather, you apply ink from the ink bottle onto the stamp bottom, then wait about ten minutes for the ink to fully soak into the stamp. Once it does, you stamp scratch paper to get rid of excess ink and make sure you have a clear design.
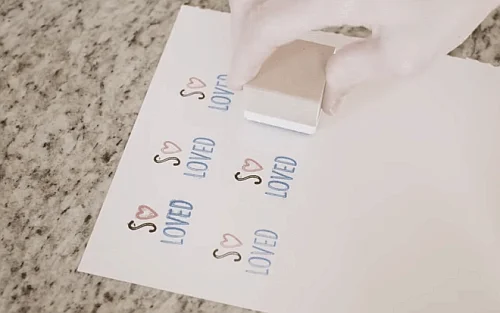
After that, you can stamp up to 50 times before having to reapply. This is a major timesaver over traditional stamps, which require constant reapplication of ink in order to work. The ink used on these stamps also provides excellent definition without any spottiness or extras, really helping to standardize the stamping process.
The force of your impression determines how much color will appear in the resulting stamp. If you want a super vibrant design, just press harder. If you want a light or pastel effect, press more lightly on the back of the stamp as you apply it to the paper surface.
Using the Stamp
While the above factors make Silhouette Mint stamps great for projects, there is one downside when it comes to using the stamp: You can’t change the colors between stamps. Rather, you must let the ink run out over the course of the 50 stamps or so, which means that it’s not a good system for people who want to do individual projects. It’s really made for those who will be mass-producing their designs for applications such as:
Invitations
Tags for merchandise or gifts
Logos on business cards or postcards
Wrapping paper
And more
Supplies and Accessories
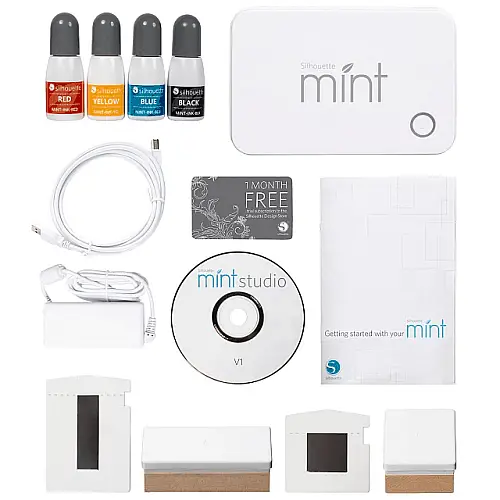
The Mint Silhouette comes with a wide range of supplies and accessories, and you can buy more separately as well.
The full package comes with:
Stamp maker
Power cord
Ink in blue, red, yellow and black
15mm x 60mm stamp kit: one stamp sheet, stamp mount, stamp base, two labels
30mm x 30mm stamp base
One month free trial to the Silhouette Studio online store
Installation CD
Quick start guide
All of these materials, including the machine, usually cost around $130. You can purchase add-ons for extra.
Extras
Because the starter kit only comes with a few stamp sheets and bases, the vast majority of crafters have to buy additional supplies. You can, for instance, purchase stamp kits that come with stamp sheets and stamp bases. Or you can just buy stamp sheets, create the stamps, then switch them out with existing stamp bases (essentially sharing one base among many stamps of the same size). Alternatively, you can choose to use stamp bases from another supplier or that you make yourself rather than buying the ones that Silhouette supplies.
Additional ink colors for purchase include brown, ash pink, magenta, red, yellow, green, ash blue, blue, purple and black. There are a number of other colors as well, which you can find by searching on the Silhouette site or through other retailers.
Software
The Silhouette Mint comes with a full software package to enable designing and printing. This brand new software is totally user-friendly and easy to learn to use, and possesses a wide range of abilities.
Software Abilities
Using the Mint Studio software, you can change the style and size of text, add text to stamps, add shapes and borders, or customize your stamp design with various styles and patterns. You can also draw freehand to create original stamps, curve text, and change the size of the stamp. If you need to, you can shrink pre-designed logos and designs to fit the size of your stamp. There’s no need to trace or scan your pattern; all you have to do is upload the design and place it on the stamp. Changing the color style or patterns of text and shapes is also easy, so you can create multiple variations on a theme.
Subscription Services and Upgrades
This software comes with the kit or is downloadable from the website. There is no subscription necessary since the software is free, but frequent downloads from the website will help to ensure you always have the most up-to-date software and the latest features. You’ll also get 50 free designs when you install it.
Overall Review
While the Silhouette Mint is admittedly somewhat expensive if you consider the cost of extra stamps, the price really isn’t bad for a crafter or business that uses it consistently. Plus, the Silhouette Mint is both quick and quiet, perfect for a home crafter who doesn’t want to wake the baby or an office employee wanting to work unobtrusively on a project in a busy office space.
It is also lightweight and highly transportable, perfect for packing in your purse or suitcase for crafting on the go. Its dimensions are 3.2 x 4.8 x 2.2 inches and its weight is 11 ounces plus the two cords. There is another similar machine on the market, the Casio Pomrie, learn the difference in my article, Silhouette Mint vs Casio Pomrie Stamp Maker.
Integrating pre-made designs into the Mint Studio software is easy, as is designing right in the software. Printing, inking, and stamping are all easy as well, so while there may be a minor learning curve in using the software, the machine itself, and the stamps and ink, it is really quite user-friendly for crafters of all experience levels. Anyone who wants the ability to create customized stamps would be happy to own this machine.
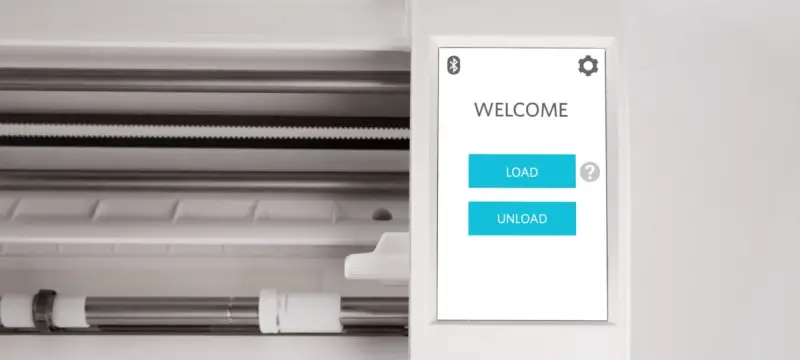
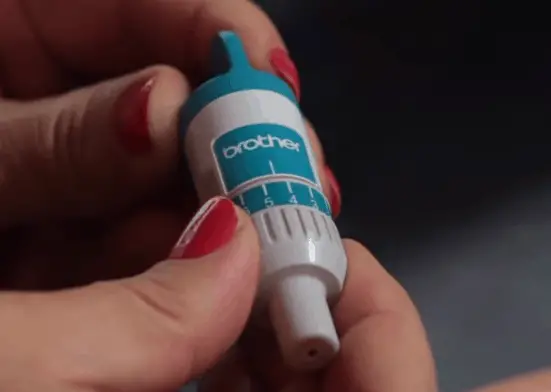
Crafters are flocking to the Brother ScanNCut2, with tons of new unique features and a huge range of scanning and cutting abilities. This electronic die cutting machine has a built-in 300 DPI scanner, with a large screen that makes working with patterns and adjusting cuts easy. It can operate as a stand-alone machine, or be connected to the computer. Let’s get started with the Brother ScanNCut2 review.
The Brother ScanNCut2 enables a wide range of projects by allowing you to scan virtually anything into the unit, for which the machine will automatically create cut lines. Stamps, cutouts, photos, hand-drawn designs or images printed from a computer are all fair game, and once you scan, you can save that image to the cutter’s internal memory, save to a USB drive, or upload to the computer.
Design and Features
This top-quality scanning and die cutting machine can’t be beat in terms of precision and usability. It has a wide range of design features that crafters adore for their versatility and power. It is also a pretty straightforward machine to use, and while there is a learning curve with both scanning and cutting, it is nevertheless easier to use than some other electric cutting machines, with an excellent manual and engaged support forums.
Check out the ScanNCut2 video overview:
Scanning and Cutting
While other cutting machines might limit your options with a limited range of scanning and cutting ability, the Brother ScanNCut2 does not. It allows you to scan nearly any design or image you can think of to turn your family photos, favorite storybooks, hand-drawn images, kids’ artwork and more into beautiful, lasting artwork in fabric and paper.
Once an image is scanned into the machine, the ScanNCut2 can automatically detect and create cut lines. Because the scanner is so powerful, it will sometimes detect unwanted spots as images, which can be easily deleted afterward.
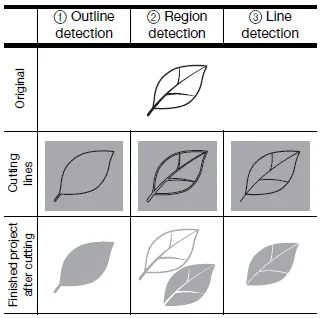
When creating cut lines, there are 3 modes:
Outline detection allows you to cut around the outside of a shape while ignoring any lines inside the main cut.
Region detection cuts both outside and inside lines.
Line detection mode will only cut the lines inside the design and will ignore the outline around it.
Brother ScanNCut Cut Modes
The line detection mode is not available when you have color detection on. Scanning in grayscale mode is preferred when the scanned image has clear outlines or distinct brightness differences. Color recognition mode is preferred when you want to cut around certain colors. You can even select the number or colors you want to detect for greater detail and accuracy.
Blades and Mats
The German Carbide Blade with Japan Design Quality ensures that you’re always getting the best cut so that your one-of-a-kind designs and patterns always come out looking the way you want them to. The cutting mat enables you to scan, draw or cut a wide variety of designs with ease and comes in two sizes: 12″ x 12″ and 12″ x 24″. The mats also come in three different types, low-tack, medium-tack, and standard. The lower-tack adhesion versions handle more delicate materials without ripping or pulling.
If you find some mats aren’t quite sticky enough, this is easily remedied by taping down corners of material before scanning or cutting.
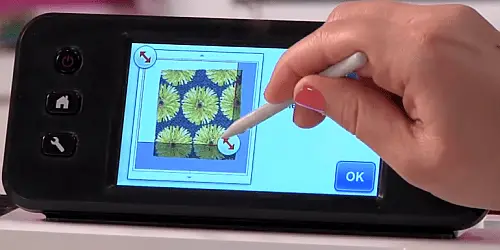
On-board Display
The 4.85″ colored touch display enables super high-quality image resolution and is glare-free, so you can always see what you’re doing. With the display, users have the option of selecting and editing images, including:
Welding shaped and fonts
Rotating and mirroring
Changing size and location
Manipulate fonts, including changing the spaces between characters
Add margins around shapes
…and much more
Hardware and Internal Memory
The built-in touch screen makes manipulating designs and images easy, and its stand-alone option means you don’t need to have a computer nearby or cartridges in order to properly use the machine. You can use USB drives or a USB cord to transfer files from the machine to your computer, and Brother sells ones that are specifically designed to be compatible with the machine, though you can also use your own. If you like, you can also save images to the machine’s internal memory, though this more limited.
You can also transfer designs from ScanNCut Canvas (an online software application that we will discuss in more detail below). Additionally, you can transfer .FCM cut files from the machine to your computer for further editing in programs such as Illustrator or Photoshop. This requires a USB cable, which is not included.
Wireless Connectivity
The New Brother ScanNCut2 also has an exciting new feature in the form of wireless connectivity. Not only can you connect wirelessly to your computer or tablet in order to transfer design files and image data from the cutting machine to applications on your computer and vice versa, but you can also transfer to the online software application, ScanNCut Canvas. Transferring files instantly back and forth permits a much higher level of design accuracy than just using the machine on its own, though that is certainly enough for many crafters.
See how you can download and upload designs in this video:
https://www.youtube.com/watch?v=Ntr2WwOOlDs
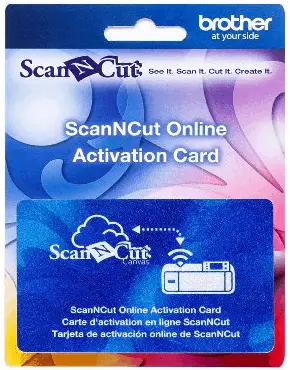
The Brother ScanNCut CM650W is wireless ready and comes with the necessary activation card to start immediately taking advantage of the wireless capabilities. However, while the CM350 does also have wireless capability, the activation card must be purchased separately
.
Improvements Over the Original ScanNCut
This series is a definite improvement over the original. While the original ScanNCut boasts most of the features of the newer machines, there are some crucial differences.
For one thing, the ScanNCut2 has a 30 percent larger screen, which makes it possible to magnify designs and images up to 400 percent as well as move the cuts around. This significantly increases the manipulative ability of designs, as well as accuracy, enhancing the power of the machine to aid in sewing and scrapbooking projects and others.
Plus, the new project gallery offers step by step instructions and downloadable cut files, helping you create unique projects using either the designs that come with the machine or the ones you make yourself.
Another noticeable difference is wireless capability. The older model did not allow Wi-Fi transfers of files, making the design process somewhat more cumbersome than it is now, assuming you buy the CM650W or the CM350 with the activation card sold separately. This machine also allows you to import SVG files, making the transfer of designs easier.
Using the Machine
Again, the machine is relatively easy to use and learn, although there is a bit of a learning process when it comes to scanning, cutting and drawing.
Designing files can be done in the machine or on your computer or tablet, using either your own program or the Canvas software. If you design in Illustrator or Photoshop, save the image files in .JPG or .PNG for opening in Canvas, where you can then save them in a format your ScanNCut2 machine can read. Afterward, you can transfer the file to the machine.
Another way to set up a design for cutting is to choose one of the many files the machine comes pre-loaded with or to scan in a design from a piece of fabric, a photo, a magazine or any other design. If you’re especially creative, you can even use something like a leaf or an old art print. As long as it lays flat, it can be scanned and turned into a design. You can also draw your design using pen tools.
Once you pick your design, you then tell the machine how deep the cutting depth is depending on the type of material you will be using. We will talk in more detail about materials and cut depths below; for now, know that as long as you tell the machine the rough depth of the material, the blade will do a precision job that you’re bound to be happy with.
There is a learning curve when it comes to cutting the fabric, as different materials of different thickness respond differently to various cuts. Brother recommends keeping a cutting log or cutting journal wherein you record how best to go about cutting various material types and thicknesses, so you can track how your individual machine works best.
Fabric-Related Features
The Brother ScanNCut2 is beloved by quilters, sewers, people who make doll costumes, and anyone else who likes to sew. Its rich array of design and cutting features are perfect for seamstresses or tailors, as long as they are working with smaller pieces of fabric that will fit on the 12” x 12” or 24” x 24” mats.
This newest addition to the ScanNCut family comes with many extra fabric-related features. The Rhinestone Trial Kit, for instance, comes with the ScanNCut2 CM350, allowing you to test out rhinestone pattern projects for shirts, bags, and other projects. Quilters will love 140 free quilt patterns.
It cuts a huge variety of shapes and fabrics without difficulty, which enables intricate quilting pieces and appliqués for your most detailed projects. Of course, it can also handle plain cuts, perfect for anyone making the same cut over and over again and desires a high degree of precision.
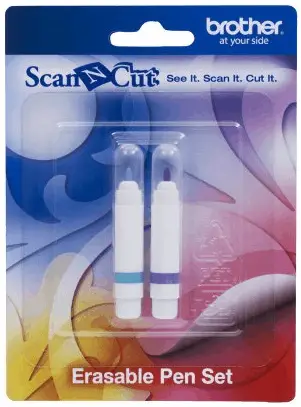
Perhaps the most exciting feature to sewers is the ability to create seam allowances in ¼” increments. This can help make sewing projects and quilts much easier. Also helping with sewing is the erasable pen set, which puts air or water soluble sewing guidelines in place to make stitching projects a breeze.
Model Comparisons
Of the two new Brother ScanNCut2 models, the CM650 is more expensive at $499, while the CM350 is more affordable at only $299. However, the CM650M has all of the new features added, while the lesser model has only some of the new features, as compared to the original Brother ScanNCut. Here’s a closer look at the differences between them.
Brother CM650W
This model comes with more than 1,000 designs built-in to the machine as well as 15 fonts. It can easily transfer appliqué files and includes .PES, .PHC and .SVG data readability. It also includes the erasable pen set and seam allowance features, as well as a 6-color pen set, middle track adhesive mat, touch pen and spatula stand, and the wireless activation card. Additionally, this model includes 2 sheets each of High Tack Fabric Support and Iron On Fabric Contact.
Brother CM350
This simpler model only includes around 600 built-in designs and 7 built-in fonts, though that is plenty for many crafters starting out. This model does not read .PES and .PHC files, so if you want to be able to transfer appliqué stitch data, the CM650W is probably the one for you. You will also need to buy the wireless card separately, as well as the other accessories listed above. However, it does come with 2 color pens and the Rhinestone Trial Kit.
The Brother ScanNCut2 helps you create a huge variety of projects. You can scan and cut shapes both plain and intricate, quilt pieces, sewing patterns, fonts, hand drawings and more. The LCD touch screen display makes viewing and manipulating your shapes easy, so you can be sure your cuts will be perfect. The machine simplifies cards, scrapbooking, banners, holiday garlands, party decorations and much, much more.
Doll makers will appreciate the ability to quickly and easily cut out fabrics for doll outfits, while quilters will benefit from the sophisticated cutting ability that makes even the most difficult designs possible to cut.
This machine can handle a wide variety of materials, including paper, fabric, canvas, burlap, denim and stabilized fabrics for quilting. It can also handle cardstock, and any other material less than 1.5mm in thickness. Be sure to use the correct blades when cutting: the regular blade goes to .8mm, while the deep cut blade goes all the way to 1.5mm.
Software
This machine uses the free online application ScanNCut Canvas. It is a cloud-based program for editing and designing cut data, and enables you to convert .SVG files to .FMC format. It also includes a project gallery to help you create amazing personalized projects with little trouble, offering step-by-step instructions and design templates. There is no subscription required.
See some of the features of Canvas in this video:
The application is tablet-friendly, allowing you to edit files and transfer them to your machine later, and allows you to import files in a variety of formats, including .JPG and .SVG.
While the program is useful, it is quite basic. Experienced crafters will likely prefer to create design files in a more sophisticated program and transfer them to Canvas for file conversion, then to the machine for scanning and/or cutting.
Support
Brother offers a good deal of support to its users. In addition to hosting a full customer service team for questions, concerns, and technical difficulties, they have physical retail locations. There is also a thriving online community with which to share ideas and features.
Overall Review
Both the CM650W and the CM350 are excellent machines for crafters who want the ability to scan, cut and draw without having to be tethered to a computer. These Brother die cut machines are somewhat portable and highly flexible in design terms, allowing a huge range of projects. There are more powerful die cutter machines out there, which can handle significantly hardier materials, such as metal and wood. However, for the sewer or paper crafter who doesn’t mind working in relatively small sizes, this machine is perfect.
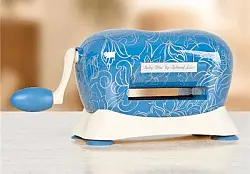
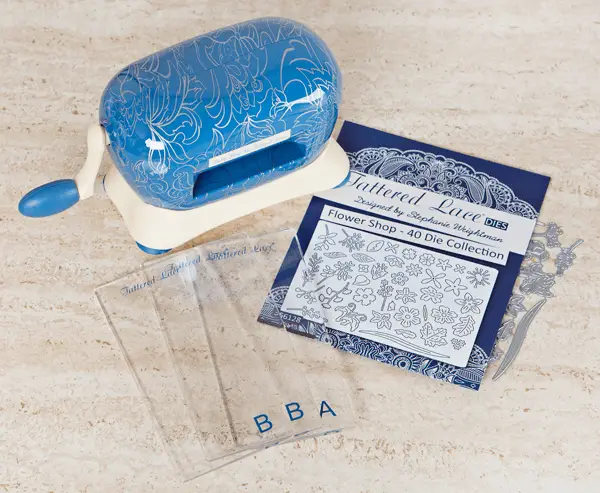
The Tattered Lace Baby Blue die cutting machine is a cute, compact, and ergonomically designed die cutting machine offered through Create and Craft TV. Having a 7.5 cm / 3” cutting and embossing width, it is best for smaller projects, such as homemade cards or scrapbooking.
The Baby Blue die cutting machine is lightweight and compact, making it great for traveling and saving space in your craft room. The machine has an internal aluminum body and suction feet to secure it to you are working area.
This machine is also great for beginners because it comes pre-assembled and there are no complicated sandwiches to figure out, which also make it ideal for younger children.
Packages and pricing
Right now, there are two machine packages that are priced significantly different. One of the packages comes with the Flower Shop Die Collection and is priced at £129.98. The stand-alone package without the Shop Die Collection is only £49.99. If you are a Create and Craft TV member, you will be able to save on both of these packages.
Each package comes with the following:
Tattered Lace Baby Blue Die-Cutting Machine
1 A Base Plate (7.8cm x 16cm approx.)
2 B Cutting Plates (7.8cm x 16cm approx.)
Instruction Booklet
The Flower Shop Die Collection package comes with a whopping 40 dies, and none of the packages include an embossing mat. Some users have suggested you buy a larger embossing mat and cut it down to the right size.
Comparable Machines
The Baby Blue machine is very similar to the new Spellbinders Sapphire machine, which cuts and embosses up to 5.71cm / 2.25″. The Sapphire Machine does seem to have some advantages over the Baby Blue. Unlike the Baby Blue, the Sapphire machine has folding sides to help guide the sandwich through the machine. It also comes with an embossing mat.
Common Questions
Here are some common questions about the Tattered Lace Baby Blue die cutting machine:
What is the dimensions of the largest die I can cut?
You can cut any die up to a size of 7.8cm wide x 16cm long (3.07” wide x 6.29” long) on the standard plates and 7cm wide x 25cm long (2.7” wide x 9.8” long) on the extra long cutting plates.
Will the Baby Blue cut other brands of dies?
Yes, as long as they are thin dies that fit within the plate dimensions.
Why is the die not cutting all the way through?
Very detailed dies may take more than one run through the machine to cut. It may also be beneficial to add a paper shim to the sandwich.
How do I emboss a long strip of card using an embossing border folder?
Create the sandwich. Run the sandwich through the machine. Move the folder along the plates and run through again. Repeat until the strip is completely embossed.
Overall Thoughts
The Tattered Baby Blue die cut machine is great for working with smaller projects. Its compact size and lightweight material make it easy to store and carry around. Be careful, however, what package you buy as there is a significant difference in price.