
The Cricut Maker is a versatile die cutting machine that, when paired with the rotary blade, is ideal for cutting fabrics. One tedious job the Maker can do for your next quilting or sewing project is cutting fabric strips.
To cut fabric strips with a Cricut Maker:
- Make or purchase a strip design
- Cut fabric to 12”x12” or 12”x24” depending on your Fabric Grip mat size
- Stick fabric to the mat
- Select the project and material type in Cricut Design Space
- Load the rotary tool
- Load the mat
- Press go and start cutting
There are a few important steps to follow and, in this article, I’ll work through them step-by-step so that you can become a master at your craft and easily cut fabric strips
Before you can cut your fabric strips, you need to upload your design and prepare the fabric strips you want to cut. Follow these steps below
Create or Upload Your Strips in Cricut Design Space
You have two options for getting strips into Cricut Design Space. You can purchase a premade SVG file online or you can create one yourself. Since strips are fairly simple I chose to make my own design in Design Space.
At this point, I’m assuming you have already downloaded and installed Design Space. If not head over to Cricut and install it.
Cricut Design Space can be a bit temperamental so SAVE FREQUENTLY! This will save you a ton of headaches if Design Space crashes on you. If you are struggling with Design Space being slow, check out my article for some possible fixes, Why is Design Space slow and how to fix it.
Open a New Canvas
Start Cricut Design space and open a blank Canvas. You can select “New Project” for the home screen or go to the upper left side, select the three lines for the menu, select Canvas. If you already have something on your canvas select the plus sign on the upper left to get a new blank Canvas.
Decide on the Length of Your Strips
The length of your strips will depend on the size of the pink Fabric Grip mat you have. If you have the 12”x12” mat the maximum length strip you can create is 11.5”. If you have the 12”x24” you can make strips 23.5” long. If you need strips shorter than this then that is easy too.
The length of strips will also depend on what you are using it for. If your project needs strips that are less than 11.5″ long then adjust your design accordingly/
Create the Basic Outline in Design Space
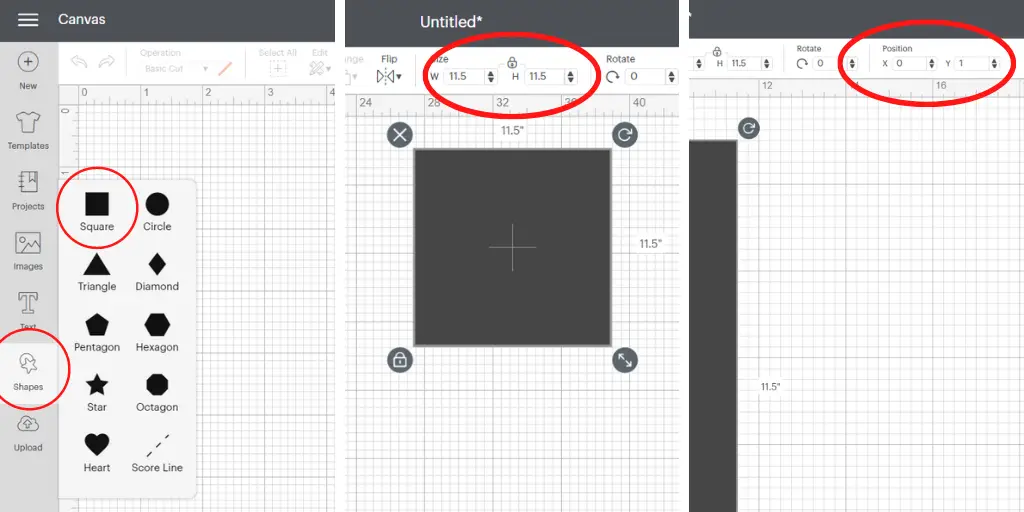
Start by creating a basic shape. Select the “Shapes” icon from the left hand toolbar then select “Square”.
A square will be inserted onto your canvas. Resize the square to your desired size, we discussed this previously. I made my square 11.5”x11.5” because I only have a 12”x12” Fabric grip cutting mat.
To resize the square, select your square then from the top toolbar type in the desired width “W” and height “H”. If you are creating a rectangle you will need to select the little padlock icon located between the “W” and “H”
A locked padlock makes the object resize proportionally. If the icon shows an unlocked padlock then the width and height can be adjusted independently.
To make later steps easier, align your square or rectangle all the way to the left, the X position should read 0. Then align the Y position to 1. The Y position doesn’t really matter but the X position at 0 will help place the strip cut lines later.
Decide on the Width of Your Strips
Next, you need to decide how thick or thin you need your strips to be. If you are creating strips for a sewing or quilting project, don’t forget to add seam allowance to your width.
For example, if I want strips that are 1 inch wide after they have been sewn and I use a ¼ inch seam then I need to cut strips that are 1.5 inches wide.
I haven’t tried making extremely thin strips, as in less than ¼” but as long as your fabric has well adhered to your cutting mat, very thin strips should not be an issue. It’s probably a good idea to test out on some scrap fabric first.
Create Strip Cut Lines on your Basic Shape
To add the actual strip cutting lines we need to add a scoring line then change it to a cut line. Select the “Shapes” icon from the left hand toolbar then select “Score Line”.
With the Score Line highlighted go to the top toolbar, under “Operation” click where it says “Score”. From the drop down menu under “Cut” select “Basic”. This changes a scoring line to a cutting line.
Resize your cutting line to the length of your strip, in my case, I’ll change the height to 11.5”. The width will be 0.
Now we need to place our cutting line on the rectangle. Since we aligned our rectangle in a previous step this is pretty easy. Change the Y position to 1, the top and bottom of the line should match the rectangle.
Change the X position of the line based upon the desired width of your fabric strip. For my strips I want them cut to 1.5” wide so I will set the X position to 1.5.
Next, we will duplicate this cut line as many times as needed. Select your cut line and either press the “Duplicate” button from the top of the right hand toolbar or right click the line and select “Duplicate”.

Once your line has been duplicated change the Y position to 0.5 so it lines up with the top of the basic shape again. Then adjust the X position as per your strip width. For my 1.5” width strips, my cut lines will be located at 1.5, 3, 4.5, 6, 7.5, 9, 10.5.
Optional Step: At this point, you can adjust the width of your basic square or rectangle to reduce fabric waste. Since my last cut line is at 10.5” and my square is 11.5” this will leave me with a 1” leftover strip. Instead I removed my last cut line at 10.5” and resized my square to 10.5” in width. Don’t forget I had to unlock my proportions so the height of the square doesn’t change too.
Attach the Cut Line to the Basic Shape
This step is very simple but extremely important. If you forget to attach your cut lines to your basic rectangle or square your strips will not cut properly.
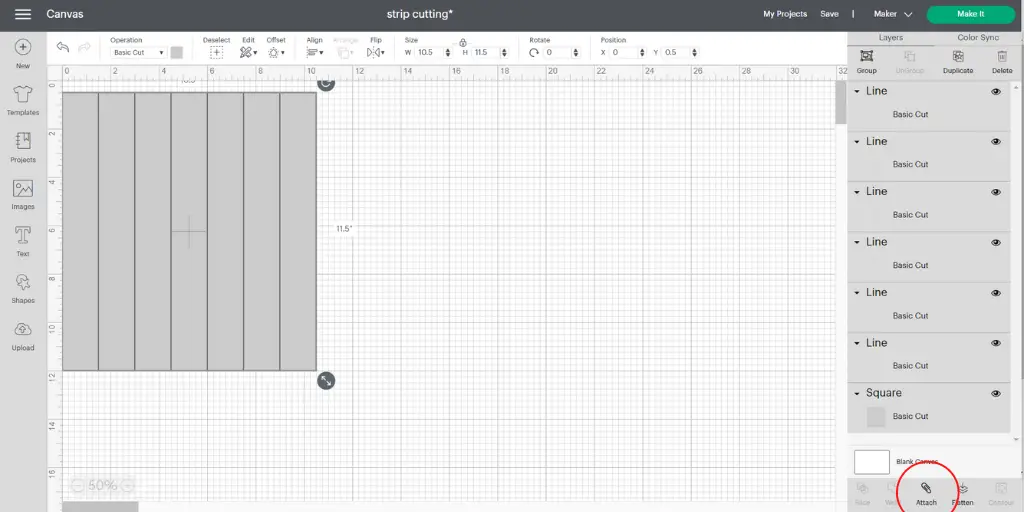
To attach, select all layers, this means all the cut lines and the basic shape. To select the layers you can hold the “Shift” key and click the layers displayed in the right hand toolbar. Alternatively, you can draw a box around your shapes on your canvas.
Once all layers are selected go to the bottom of the right hand toolbar and select “Attach” it has a little paper clip on it. Your layers are now attached and your design is ready to cut.
Prepare Your Fabric For Your Cricut Maker
Before I ever think about cutting fabric for any project I prefer to prewash it. This means I just wash and dry my fabric the exact way I would once my project or garment is finished. This reduces shrinkage and removes any sizing leftover from the fabric making process.
After washing it, I’ll usually iron my fabric to remove wrinkles. Since we are using our Cricut to cut the fabric I highly recommend ironing your fabric before cutting it. The fabric will lay nice and flat and stick to the cutting mat easier.
The next step is to cut your fabric to size and adhere it to your Fabric grip mat. For this you will need:
- Fabric
- A rotary cutter or scissors
- A ruler
- No products found.
- Cricut Fabric Grip mat
With your supplies handy you take the following steps:
- Lay out your fabric on a flat surface
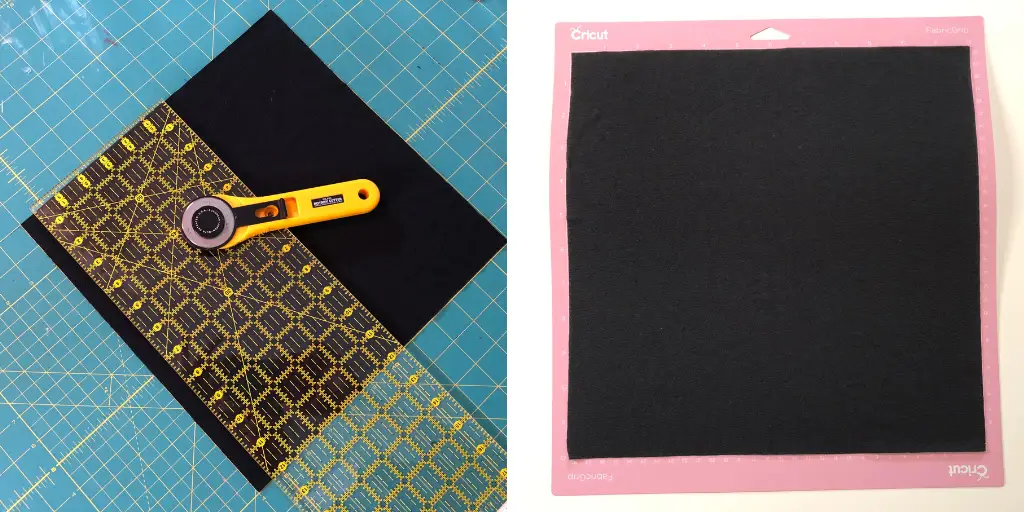
- Using a ruler measure and mark a 12”x12” square, this is if you are using a 12” cutting mat. Otherwise measure out the size you need. In my example above I measured a 10.75”x12” rectangle. Don’t worry about using a pen or non-washable marker, the edge will be cut off.
- Cut out the rectangle using your rotary cutting and ruler or a pair of scissors. Again don’t worry if your edge isn’t perfect or a little ragged, this is just a rough cut, the Maker will give you a crisp, clean edge.
- Make sure to cut the salvage off the material; it makes it easier to work with.
- Repeat until you have as many pieces as you need for your project.
- Get your pink Fabric Grip mat and remove the protective cover. Try to touch the sticky surface as little as possible.
- With your fabric face up, line the fabric edge up on your mat.
- Use a No products found. to smooth out your fabric and make it stick to the mat. If you don’t have a brayer you can smooth it with your hands or even a rolling pin. I do recommend buying one if you are going to be doing many fabric projects in the future.
Your fabric is now prepped and ready to be cut.
Cut Your Fabric Strips
We have made our design and prepped our fabric now it’s time to start cutting!
- If you don’t already have it open, open Cricut Design Space and select the project you created in the first part of this article
- Select the “Make It” button on the top right hand side of your screen. you’ll be taken to a preview of your design shown on the mat. Make sure the design looks right i.e. no cut lines where you don’t want them, no extra mats with lines by themselves.
- Open up your Cricut Maker and power it on.
- Select the green “Continue” from the bottom right.
- Design Space will take a few moments to connect to your machine.
- Set the Base Material to type of fabric you are using. Go to “Browse Materials” and pick the type that closely matches your fabric. For me that was “Cotton”. Press “Done”
- Now you will load your Rotary Blade. Open Clamp B on your machine and remove the Premium Fine Point blade.
- Remove the protective cover from the rotary blade. Insert the rotary blade into Clamp B, making sure the gears fit together properly, then close clamp B
- Place the Fabric Grip mat on the machine, making sure the mat is firmly pressed up against the rollers and press the load mat button (the one with arrows)
- Press Go. For the Cricut Maker this button with be the Cricut C symbol for the Cricut Maker 3 it will look like a play button (a triangle)
- Once your fabric is cut, use tweezers to to remove your strips and discard the left over fabric pieces.
- If you need to cut more strips then prep you mat and cut the strips out following the method above.
Now you have successfully cut strips for your project and are ready to use them in your project.
Rotary Blade Vs. Bonded Fabric Blade: What’s The Difference?
It is important to choose the right blade for cutting the right materials, and you need to know what they are used for.
The rotary blade is better for cutting fabric because the bonded fabric blade can sometimes pull or shred the material, whereas the rotary blade eliminates this issue. The only downside to the rotary blade is that some materials such as felt can dull the blade. Be sure always to have a backup rotary blade available.
Rotary Blade
If you are using the Cricut Maker, you don’t need the bonded fabric blade because the Maker can use the rotary blade to cut your fabric. It is designed to cut materials with less density, like cork and tissue paper, and soft and delicate material.
It is designed and works just like a handheld rotary cutter. It rolls the blade across the fabric cutting it without tearing.
The rotary blade is included with the Cricut Maker but is sold separately with the Cricut Maker 3. Get the rotary blade from Cricut.
Bonded Fabric Blade
The bonded fabric blade is used for intricate cuts on fabric with iron-on backing or bonded fabric. If you are using an Air 2 to cut bonded fabric, you need the bonded fabric blade.
Fabrics need to have some sort of iron on backing to stabilize it when the bonded fabric blade is used. The bonded fabric blade is dragged across the fabric which can lead to tearing and pulling if the fabric is not properly backed.
Can You Cut Multiple Layers of Fabric at Once with the Cricut Maker?
The Cricut Maker can cut 2 to 3 layers of lightweight cotton using the rotary blade. This can only be done if the layers have been bonded together with a temporary adhesive fabric spray, such as basting spray.
The layers need to be well adhered together then stuck down to the Fabric Grip mat. When basting spray is used the fabric should be handled as little as possible prior to cutting since the adhesive breaks down with movement. Fabric layers should also be stuck together before being stuck to the mat to prevent overspray on your pink Fabric Grip mat.
Cricut has more details on how to do this here.
Final Thoughts
Cutting fabric strips with your Cricut Maker will be a little bit time consuming the first time you do it since you will have to create your own cut file. But once the cut file is made, or purchased, it can be used over and over again.
It may take a while before you become an expert working with the Cricut Maker, but as we all know, ‘practice makes perfect. Part of the fun is exploring, testing, altering, and making all the designs.